Search DtsArt Blog

click to visit www.dtsart.com

Tuesday, August 31, 2010

Take Out Tuesday Pinwheel Card SVG Download August 31


Hi Dandi Crafters! Welcome to another edition of Take Out Tuesday. Today's SVG download is a simple but very useful pinwheel card. It is great for journaling, adding a funky message to another card or even using it as 3x3 gift tag. I use all this pinwheel card all the time!
The file contains the SVG and SCUT SCAL format along with terms of use and copyright.
The zip file contains:
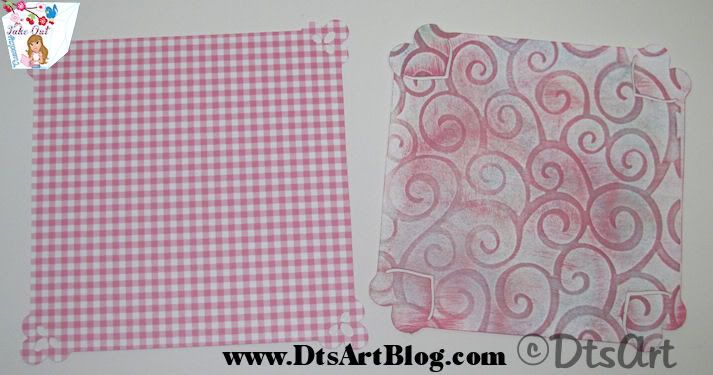
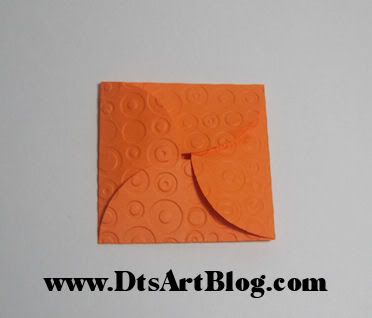
•Pinwheel Card Cut(shown in orange)
If you have never used a Pinwheel card you may have a little bit of a challenge figuring out how to fold it so here is a quick tutorial
1. Score all the side. Then Lay the card in front of you with the half circles on the top and bottom. The pointed circles should be to either side. See picture

2. Fold the bottom circle, the one that is closest to you, up to the middle.


3. Fold the right half pointed half circle toward the middle.


4. Fold the top half circle down to the middle.


5. Fold the left half pointed circle to the middle. Lift the bottom half circle up on the left side and tuck the pointed end under the bottom circle.

It should now look like this.


There you did it. Click the link below to watch this little snippet on folding for a better grasp. The beginning frame is when it is fully open.
Watch Snippet on Folding

I hope you enjoyed today's Take Out Tuesday. I provide Tuesday's Take Out as a way to say Thank you to my regular followers.It is available on Tuesday and Wednesday, on Thursday we throw out the left overs. Don't forget to follow my blog so you will not miss anymore Tuesday Take Out.

Download: No longer available. Please join us next Tuesday when Fresh Take Out will be posted. Be sure to become a follower so you will not miss anymore Take Out Tuesday Freebies. Take Out is posted for my followers to download on Tuesday and Wednesday, on Thursday we throw out the left overs.

Wednesday, August 25, 2010

MyGrafico Challenge No # 63 : Halloween Apple Brothers Stamp :Trick or Treat Night


Hi Dandi Crafters! Don't get spooked but this week over at MyGrafico Challenge Blog we turn our attention to Halloween. LOL I just love this darling Halloween Apple Brothers Stamp by Cherie Reve.

You can check out the whole gallery of talented artist at MyGrafico.
The reason I loved working with this whimsical stamp so much, is that I have 3 boys close in age and when they were little I used to dress them in matching and coordinating outfits all the time. This brought back fun memories of those days.
I enjoyed making this card. I do want to say however that the card layout is scrap lifted from someone. I apologize I did not taking note of who's blog it was. If it is your card I scrap lifted email me and I will definitely give you credit for the layout. Not everything is exactly the same but enough of it that I feel I needed to give credit, just wish I remembered to who....LOL
All the pattern paper is my original designs. I have to say to those of you that buy and USE pretty pattern paper and card stock. I admire you. I only buy it. I can't bring myself to use pattern paper that I buy. I am guessing that it is because if I use it then I won't have it in the future when that perfect project comes along that I need it for....LOL Yes, yes I do know rationally that the perfect project I am saving it for will NEVER come along but scraptionally (like my word, just made it up feel free to use it. LOL. It means scrap rationality. Which we all know is something entirely different that rationality.ROTFLMBO) I can't bring myself to part with the pattern paper, to take scissors to it, to give it the honor of being placed on my Cricut mat for cutting. LOL ....Anyway back to the pattern paper. I think harlequin paper is just so fun for Halloween, don't you. Polka dot paper is great for every occasion. The orange pumpkin paper was just a no brainer for the card, although it was a multicolor paper I added an effect to make it a monochromatic. What about that spooky tree isn't it cute. It is from Cricut Cartridge Paper Doll Dress up page 52, accessories 3 with shift applied. I then added black glitter paste. Hey if I didn't add glitter paste to it how else would you know it's me...LOL I added it this time not so much to make it sparkley but to give it some spooky texture. I then added a few little rhinestones just for fun. And there you go one cute halloween card!

Tuesday, August 24, 2010

Take Out Tuesday Scallop Box SVG Download August 24

Hi Dandi Crafters! Happy Take Out Tuesday to you! I have been in a real box mood lately so I decided to share one with you.
The box as shown in the picture is about 3.75 square and is just shy of 2 inches deep. Both SCAL and SVG files are included in the folder along with copyright and terms of use.
The zip file includes:
•Scallop Box Cut (shown in Green)
•Scallop Lid Cut (Shown in Orange)
•Scallop Corner Cut (Shown in Turquoise)
I hope you enjoy Tuesday's Take Out. Thank you following along with me. It is always enjoyable and encouraging to me if you leave comments too. Also if you haven't done so already leave your opinion about what you would like the 200 Follower Celebration to be and a big thank you to those that have taken the time to give their opinions.

Download: No longer available. Please join us next Tuesday when Fresh Take Out will be posted. Be sure to become a follower so you will not miss anymore Take Out Tuesday Freebies. Take Out is posted for my followers to download on Tuesday and Wednesday, on Thursday we throw out the left overs.

Thursday, August 19, 2010

Sweet Strawberry Matchbook Notebook


Hi Dandi Crafters! The other week I shared with you my cute little strawberry SVG download on Take Out Tuesday. (Did you miss it? If you did there is still a chance you can get it. Go to this post here and tell me which you would like for the 200 followers celebration.) I thought the little strawberry that I made for demonstration was so cute that I should do something with it.

School is right around the corner, and it always seems I need paper to write notes on for various reasons, taking someone's email address, phone number, or giving them mine. I always seem to be digging in my purse for paper in the hall ways of the school when dropping my kids off. LOL I decided to be proactive this time and I made myself this cute little matchbook notepad. How CUTE!! is it!!?!! I know it is too cute! It is about 4.25 inches wide and 4 inches tall. It is the perfect size for scrap paper that I always seem to be digging for.
The whole purpose of this project was to use the strawberry SVG die cut. I thought, "Hey. I will break out the strawberry paper that I designed too". Since the inside is visible I didn't want to leave it plain so I made double sided card stock by adding some polka dots in the mix.
I know there is all the excitement and the hype of the Cricut Imagine right now, and I too am excited to get one; however, hybrid print and cut projects are an option with your Cricut already if you have it enabled with a program like SCAL or Make The Cut. You just have to know that the x and y axis that the programs show you are your friend. They allow you line up your printing with your cutting.
Anyway I made up the cute little paper in paint shop pro, printed it off and cut it out. I don't have a Bind it all or Cinch. DARN IT! so I am left with the option of staples or notepad glue. I decide to go with staples this time. LOL I printed about 50 little note pad paper. I cut them out using my SCAL enabled Cricut 4 at a time. Since the point of this little matchbook notebook was to have scrapbook paper I wanted to be sure I could tear out the pages easily to be able to give them away. So I used my handy dandi little perforater by EK Success Cutterpede. I will tell you, I don't use the perforater very much at all in projects however when I need perforation there is NO REPLACING it. LOL After perforating the pages I just got my heavy duty stapler out and just stapled the pages into my little matchbook. The pages tear out, it is functional, and cute. What more could I ask for.

I finished decorating the front by glittering a smaller strawberry svg. I also used the Cricut Storybook Cartridge and cut out the word Sweet for the front finished up the look with some ribbon and a Martha Stewart Border Punch.

Blogging Out Loud Re: 200 Followers Celebration Input


Hi Dandi Crafters! It looks like I am closing in on 200 followers. 100 followers kind of snuck up on me and I can't say that I was all that prepared for it. So I have been thinking about 200 followers and what to do. So I am blogging out loud in hopes that you my followers will give me some input on what you would like for the 200 Celebration. You let me know what you think. Here are some thoughts:

1. Make ALL previous Tuesdays Take Outs available for download for a week so everyone can catch up on the ones they might have missed.

2. Give away a Blog Make Over

3. Give away 5 complete sets of my never released monster SVG's

4. Give away 5 blog grab button designs

5. Give away to 5 followers 12 digital scrapbook paper files so they can print them whenever they want.

6. Do a general scrapbook RAK, of scrapbook stuff, that I mail.

Here is the sample of the monsters.


Wednesday, August 18, 2010

MyGrafico Challenge No # 62 Monkey Fun Stamp : Go Wild

Hi Dandi Crafters! It is Wednesday, and that means it is time to head over to MyGrafico to get ready for this weeks challenge. There is lots of inspiration this week over at the MyGrafico Challenge Blog. This week is anything goes. We are using these Monkey Fun Stamps by Primsy Doodle.

They are so cute, I knew immediately what paper I was going to use when I saw the digital stamps. I made the monkey paper and plaid paper last April and knew it would be perfect for this project. Isn't it just perfect. I didn't even have to tweak the color at all. Just Perfect! I was browsing blogs and saw a great frame made out twigs and I really liked the look so I made something similar for my monkey card. I just made some twigs using SCAL and cut out 4 of them. I added some ink to the edges and tied them up with wire, such a cute look for the monkey. I printed out an extra monkey in the trees and then cut out the leafs and put them on top of the first monkey picture using pop dots. I grabbed my trusty Create A Critter Cartridge, I KNOW I KNOW I should change my blog name to, ..."Yet Another Create A Critter.." LOL; I can't help it I LOVE the cartridge, and cut out the leaf that is on page 51 in the handbook. I thought the, "Go Wild" on page 29 was perfect too so I used that. I inked the leaf a little bit and there you go. A pretty simple card, yet it really makes a statement. I hope you enjoyed it. I know I did, but I always enjoy it when you stop by for a look-see and a chat!

Tuesday, August 17, 2010

Take Out Tuesday Bracket Tag SVG Download August 17


Hi Dandi Crafter! Thanks for joining me for another Take Out Tuesday. Today we have a cute little Bracket tag. I needed a small bracket tag with holes on both sides. I looked at some of my cartridges and didn't see one exactly like I needed so I made one up.
You will find both the scut file and svg file so you can cut it with your favorite cutting machine. It was designed with SCAL 1 so it should work both in SCAL 1 or SCAL 2. Also included are the folder is copyright and terms of use.

The zip file includes:
•Bracket Sign Blackout Layer (At the very bottom, shown in blue)
•Bracket Sign Shadow Layer (Shown in green,under the pink layer. Look at the holes.)
•Bracket Sign Layer (Shown in pink)
(hello is not included in the file)

The Shadow layer and the sign layer are the same size, it just depends on if you need a hole or not. The project I needed it for needed a hole on each side. (Sorry, can't show you that one just yet,it is getting ready for publication. It should be posted on my blog around mid November. Along with a very cool announcement. Be sure to check it out.) This file does well being cut small , on my project I cut it at just over 1.5 in width and just under 1 inch in height.
Thanks for following along with me. Enjoy this weeks Take Out Tuesday Freebie. Please download it soon because as you know Take Out Tuesday are available on Tuesday and Wednesday and on Thursday we toss the left overs.

Download:No longer available. Please join us next Tuesday when Fresh Take Out will be posted. Be sure to become a follower so you will not miss anymore Take Out Tuesday Freebies. Take Out is posted for my followers to download on Tuesday and Wednesday, on Thursday we throw out the left overs.

Friday, August 13, 2010

Cute Chick Logo


Hi Dandi Crafters! I don't show all my graphic work only selective projects. Yes I work more than I let on....LOL hehehe.
I do really like the way this little logo turned out. Maybe I think it will make a cute card stamp too. I recently got to work with Vanessa over at the Country Chicken Creations Blog. She wanted a little chick to call her own. I could totally relate. Gee I have been using my girl for oh 4 or 5 years now. People see my girl and they know it is me. It is kind of cool really. Vanessa came to me because she wanted a chick of some kind drawn so she could get a stamp made from. She wants to stamp the back of her cards that she makes. She makes some super cute ones too. After discussing the chick with Vanessa a bit she told me she wanted a chick with an umbrella and/or rubber boots. I thought that was a super cute idea, so I helped Vanessa bring her idea to life. That is what I like about the graphic work. I meet so many people that have an idea about what they want but don't know how to go about getting the idea out of their head and into a medium that they can use. It is really fun to me. Pop on over to the Country Chicken Creations Blog and have a look at her blog logo it is super cute and a bit different than what is shown here. Feel free to drop me a line if you need some graphic, blog or web site design done, well have fun!

Thursday, August 12, 2010

Pink Onesie Card and an Initial Faux Appliqued Onesie for Ella

A while back I posted that I won RAK from Addicted To Paper. I am always struck by the generosity and kindness that goes on in the scrapbook community and all the lovely people that congregate in the scrapbook community. It is a very lovely community, glad to be a part of it. Y'all are just SO NICE!!!
Well anyway to get to my story, Tammy and family over at Addicted To Paper recently  added a couple of feet to their house by the name of Ella. So like the saying goes, "One good deed begets another", or whatever it is that my mother always say. I sent Tammy a little welcome to the world gift for her baby girl Ella. Congratulations Tammy to you and your family. Ella is beautiful.

The pink onesie card is from an SVG file that I drew up sometime ago. I cut the card using Sure Cuts Alot, SCAL. That is such a useful program and opens up a world of possibilities for your Cricut. Since the card was a girl onesie I wanted scalloped sleeves and neckline. I also used SCAL to cut out the scalloped neckline and sleeves. After I had them cut out I then added my glitter paste in pink. You can find out more about my glitter paste here. The little bird is from the Cricut Cartridge Create A Critter Page 45, Bird 2. I used companion cuts on page 45 again the Layer 1 button with shift applied. The wing is also on page 45, Layer 2 again with shift applied. The circle that the little bird is on is also from Create A Critter, page 43, the Phrase button. The pink polka dot paper was rather fun to create. I had, of course, some light pink polka dot paper on my computer that I printed off on pink card stock. I really liked the effect. I then took my homemade pearl spray that I discussed here and sprayed it on the card stock but instead of copper acrylic paint I used pink acrylic paint. I like the shimmery pearl look it added to the card stock. Since this was a flat note card I didn't want the back to be naked...LOL so I dressed that up using the same scalloped cuts for the neck and hole openings that I used on the front. I then added a little message of congratulations to it. The little accent card  with the message was cut out using SCAL from a cut that was a Tuesday Take Out download a few weeks ago. I think the whole card came out rather cute.

I also made her a real onesie for Ella to wear. It is my Pink Faux Applique Initial onesie. This particular style is one of most popular styles. It is a heat screen tee not an appliqued onesie but the style really mimics the look of an appliqued letter on the front, but the best part is no worrying if something is going to come off in baby's mouth. cause it is just a tee. I came up with faux applique awhile ago LOL by accident while trying to achieve another effect. I was actually getting pretty frustrated because I couldn't get the effect right but when I stopped for a minute and let my tunnel vision pass. I notice that THIS EFFECT!! was AWESOME on it's own merit and looked very similar to piped applique. I put in on an initial onesie and the rest is as they say history!

It is not lost on me that with babies a lot of time you see their backs as much if not more than you see their front so I put this little e on the back.

You can purchase this onesie for a baby you know. You can do so on my website  http://www.dtsart.com/category_14/Initial-Onesies.htm I have many onesies to choose from.

Tuesday, August 10, 2010

Take Out Tuesday Juicy Sweet Strawberry SVG Download August 10

Hi Dandi Crafters! I really like today's Take Out Tuesday Freebie. I think it came out so cute, a strawberry that Shortcake herself would be proud of. I drew this strawberry years ago and I have used it in many designs and I was thrilled to see that it made a totally cute svg. Who knew!? LOL

In the Take Out Tuesday Strawberry Download you will find both the SVG and Scut format along with copyright and terms of use. The strawberry as you see here is just over 3 inches tall.

The zip file includes:
•Strawberry Shadow Layer (At the very bottom, shown in dark red)
•Strawberry Seeds Layer (Shown in red)
•Leaf Shadow Layer (Shown in green)
•Leaf Layer (Shown in brighter green)
•Stem Layer (Shown in the same green as the leaf shadow layer but on top)

For all those that are regulars and followers of my blog I hope you enjoy today's Take Out Tuesday. Thank you for being a regular and giving me an audience to share my scrapbook designing passion with so I am not just talking to myself...LOL Enjoy it, see you back here next Tuesday for some more Take Out.

Download: No longer available. Please join us next Tuesday when Fresh Take Out will be posted. Be sure to become a follower so you will not miss anymore Take Out Tuesday Freebies. Take Out is posted for my followers to download on Tuesday and Wednesday, on Thursday we throw out the left overs.

Monday, August 9, 2010

Upcycled Ribbon Spool Candy Treat Holder


Hi Dandi Crafters, Teri came up with a fantastically, fun challenge over at Sugar Sweet Paper Treats. The challenge is to create "cards/projects made any way but a normal side/top fold card!!" How fun is that! Anything goes! OK I am up for that!
If you knew me in my earlier crafty days you know I am in my heart a bow chick. Well being a bow chick at heart I still have lots of ribbon although my crafty bow days are mostly behind me. That means I have lots of ribbon spools. Well I took those ribbon spools and put them to some fun use. I am not the first to make a treat holder out of ribbon spools, I have seen it all over the Internet, this is just my take on it.
You take 2 empty ribbon spools, you know the thing that your ribbon is wrapped around when you buy it. Take the one side off each of the spools. Next you need a transparency. I personally didn't have any transparencies. I did however because I have kids I have TONS of plastic report covers. I buy them all the time for about 15¢ each, or some really cheap price like that. So that is what I used. I actually liked the color that using the folder adds. You cut the folder to be the height you want your treat holder to be. Mine is about 6 inches high. The width of the folder will depend on how wide you need it to fit inside the spool. Leave about 1/4 inch lap. I decorated mine, now get this with paper I bought!!! well mostly. LOL I know, aren't you proud of me! I was...LOL The striped paper, red polka dot paper and heart paper is K&Company Ka-Zoo all in one paper pad.  Honestly I don't know how you all use paper you purchased. What happens when you run out of paper that you love! It is very nerve racking to use paper that I purchased...LOL hehehehe

I needed to then cover the spool lids and make them pretty. I  measured my spool lid. It was just over 3 inches so I cut a round circle for the outside at 3.25. I used SCAL to cut circles so I know they would be exactly what I needed. The inside I cut the outline circle to make a thin accent that was 2.72. The inside of  that circle I cut another circle,that was 2.55 , inside the first circle so that it would give me a thin circle  line that I could put around the outer edge. To make the scalloped border that decorates the lid I cut a 9 inch by 1 inch piece of paper. I then used a Martha Stewart punch on it. If I didn't want to use a Martha Stewart Punch I wold have cut it 9 inches by .55 inches.

After I had all the parts decorated so all the unsightly ribbon spool parts where disguised, I then decorated it. I used Cricut Cartridge Create A Critter page 64 in the handbook to cut a butterfly for the lid. I also used Create A Critter page 64 again, the phrase button, for the red heart and turquoise polka dotted heart on the tube. The turquoise paper is my paper. LOL Create A Critter, page 62, was also used for the red polka dot scallop circle the butterfly is resting on. The butterfly on the heart is from the Storybook book Cartridge,pate 49 Fancy/Corner Button. Finally I filled the treat tube with Hershey's Nuggets. It turned out pretty cute for something that before it was assembled I might have tossed out.


Wednesday, August 4, 2010

MyGrafico Challenge No # 60 Wild Flower Stamps: Distress Vintage Mini Notebook

Hi Dandi Crafters, today's challenge over at MyGrafico is to make a distressed vintage project. The stamps that we used to inspire us are called Wild Flower Stamps by Mel's Brushes. Be sure to head over to the MyGrafico Challenge Blog and see what the whole creative design team came up with and enter your own project.
As for me....well this project is one of the reasons I like being on a design team! Vintage and distressed is just not something I would ever tackle without a good reason. I would have avoided this challenge had I not been on the design team. LOL! Like most people I tend to stick with the styles I do well that I am comfortable with and vintage distressed is not one of them. I admire, even love, projects with this look but it is not my strong suit.
The whole time I was working on this project I kept saying, "Oh My! This just isn't going to work out." I get like that sometimes when I am drawing too. Sometimes you have to complete the journey for it all to come together and make sense, if I  didn't know this from my experience drawing, I would have scrapped this project before it even got going....LOL
Overall I have to say I was extremely happy with the way my mini notebook turned out.
What I did was was, wash my hands because I had about 3 pieces of Hershey's Nugget Candies while contemplating. LOL I find that chocolate calms me when I am about to embark on unfamiliar territory in the craft room. LOL
I printed out about 6 flowers on white card stock. I cut them out and cut all but 1 apart. I then proceeded to crumple them up, put them through the crimper a few times and then smoothed them. Next I took out some Martha Stewart pigment ink pads in yellow, orange, pink and red and proceeded to bounce these inks all over all the flowers and pedals. After that I used some cuttlebug dry embossing folders to add texture. Finally I added more pigment ink to bring out the embossing. I then glued the various pieces onto the full flower after curling them all with a pencil. I used my crop a dile and punched a hole in the middle of the flower and on the cover and secured using an eyelet. I used a brad to decorate the center.
To make the cover I used white card stock and bounced pigment inks all over it and then dry embossed and smeared on more pigment inks to bring out the embossing. I then used my crop o dile to punch holes along the left side and slit each punched whole in the middle so it would fit over the wires. I wanted the word Notes to look the same but not get lost in the background. So I printed some brown grunge paper I made on my computer on beige card stock. I then took pigment inks to each letter after cutting. The font fit perfectly with this theme and is called Big Top. I then added ribbon in various colors and cropped each diagonally. Then being a former bow chick, I heat sealed the ribbon so it wouldn't fray.

Tuesday, August 3, 2010

Take Out Tuesday 2 More Loopy Frames SVG Download August 3

Hi Dandi Crafters, happy August to you on this fine Take Out Tuesday! This week I have 2 more loopy frames for you. Did you see my Corner Bookmark created using one of the loopy frames from last week? I have a corner bookmark tutorial about it.
I created this week's download  because I need a nesting frame for a card I was making. I wanted some kind of hearts but I didn't want layered hearts so I this is what I came up with. I decided to make it today's Take Out Tuesday Freebie. As you have come to expect I have created it in SCAL so the file should work in SCAL or SCAL 2. You will find SVG format and SCUT format along with copyright and terms of use.

The zip file includes:
•Heart Stencil Frame (shown in water colors and dry embossed)
•Tear Drop Cut Out Frame (shown in pink gingham)

The frames as you see them in the picture measure around 4.5 inches. Enjoy Tuesday's Take Out. I provide Take Out for my regular readers and followers as a thank you. Take Out is available for download on Tuesday and Wednesday. Thursday we throw out the left overs.

Download: No longer available. Please join us next Tuesday when Fresh Take Out will be posted. Be sure to become a follower so you will not miss anymore Take Out Tuesday Freebies. Take Out is posted for my followers to download on Tuesday and Wednesday, on Thursday we throw out the left overs.

Related Posts with Thumbnails