Search DtsArt Blog

click to visit www.dtsart.com
Showing posts with label notebook. Show all posts

Thursday, August 19, 2010

Sweet Strawberry Matchbook Notebook


Hi Dandi Crafters! The other week I shared with you my cute little strawberry SVG download on Take Out Tuesday. (Did you miss it? If you did there is still a chance you can get it. Go to this post here and tell me which you would like for the 200 followers celebration.) I thought the little strawberry that I made for demonstration was so cute that I should do something with it.

School is right around the corner, and it always seems I need paper to write notes on for various reasons, taking someone's email address, phone number, or giving them mine. I always seem to be digging in my purse for paper in the hall ways of the school when dropping my kids off. LOL I decided to be proactive this time and I made myself this cute little matchbook notepad. How CUTE!! is it!!?!! I know it is too cute! It is about 4.25 inches wide and 4 inches tall. It is the perfect size for scrap paper that I always seem to be digging for.
The whole purpose of this project was to use the strawberry SVG die cut. I thought, "Hey. I will break out the strawberry paper that I designed too". Since the inside is visible I didn't want to leave it plain so I made double sided card stock by adding some polka dots in the mix.
I know there is all the excitement and the hype of the Cricut Imagine right now, and I too am excited to get one; however, hybrid print and cut projects are an option with your Cricut already if you have it enabled with a program like SCAL or Make The Cut. You just have to know that the x and y axis that the programs show you are your friend. They allow you line up your printing with your cutting.
Anyway I made up the cute little paper in paint shop pro, printed it off and cut it out. I don't have a Bind it all or Cinch. DARN IT! so I am left with the option of staples or notepad glue. I decide to go with staples this time. LOL I printed about 50 little note pad paper. I cut them out using my SCAL enabled Cricut 4 at a time. Since the point of this little matchbook notebook was to have scrapbook paper I wanted to be sure I could tear out the pages easily to be able to give them away. So I used my handy dandi little perforater by EK Success Cutterpede. I will tell you, I don't use the perforater very much at all in projects however when I need perforation there is NO REPLACING it. LOL After perforating the pages I just got my heavy duty stapler out and just stapled the pages into my little matchbook. The pages tear out, it is functional, and cute. What more could I ask for.

I finished decorating the front by glittering a smaller strawberry svg. I also used the Cricut Storybook Cartridge and cut out the word Sweet for the front finished up the look with some ribbon and a Martha Stewart Border Punch.

Wednesday, August 4, 2010

MyGrafico Challenge No # 60 Wild Flower Stamps: Distress Vintage Mini Notebook

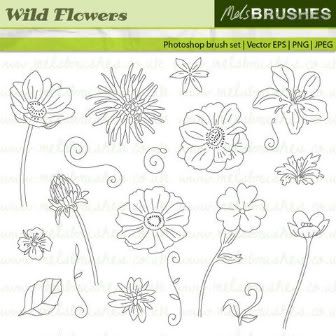
Hi Dandi Crafters, today's challenge over at MyGrafico is to make a distressed vintage project. The stamps that we used to inspire us are called Wild Flower Stamps by Mel's Brushes. Be sure to head over to the MyGrafico Challenge Blog and see what the whole creative design team came up with and enter your own project.
As for me....well this project is one of the reasons I like being on a design team! Vintage and distressed is just not something I would ever tackle without a good reason. I would have avoided this challenge had I not been on the design team. LOL! Like most people I tend to stick with the styles I do well that I am comfortable with and vintage distressed is not one of them. I admire, even love, projects with this look but it is not my strong suit.
The whole time I was working on this project I kept saying, "Oh My! This just isn't going to work out." I get like that sometimes when I am drawing too. Sometimes you have to complete the journey for it all to come together and make sense, if I  didn't know this from my experience drawing, I would have scrapped this project before it even got going....LOL
Overall I have to say I was extremely happy with the way my mini notebook turned out.
What I did was was, wash my hands because I had about 3 pieces of Hershey's Nugget Candies while contemplating. LOL I find that chocolate calms me when I am about to embark on unfamiliar territory in the craft room. LOL
I printed out about 6 flowers on white card stock. I cut them out and cut all but 1 apart. I then proceeded to crumple them up, put them through the crimper a few times and then smoothed them. Next I took out some Martha Stewart pigment ink pads in yellow, orange, pink and red and proceeded to bounce these inks all over all the flowers and pedals. After that I used some cuttlebug dry embossing folders to add texture. Finally I added more pigment ink to bring out the embossing. I then glued the various pieces onto the full flower after curling them all with a pencil. I used my crop a dile and punched a hole in the middle of the flower and on the cover and secured using an eyelet. I used a brad to decorate the center.
To make the cover I used white card stock and bounced pigment inks all over it and then dry embossed and smeared on more pigment inks to bring out the embossing. I then used my crop o dile to punch holes along the left side and slit each punched whole in the middle so it would fit over the wires. I wanted the word Notes to look the same but not get lost in the background. So I printed some brown grunge paper I made on my computer on beige card stock. I then took pigment inks to each letter after cutting. The font fit perfectly with this theme and is called Big Top. I then added ribbon in various colors and cropped each diagonally. Then being a former bow chick, I heat sealed the ribbon so it wouldn't fray.
Related Posts with Thumbnails