Search DtsArt Blog

click to visit www.dtsart.com
Showing posts with label cricut cartridge. Show all posts

Friday, February 25, 2011

Through The Year Flower Chipboard Mini Album


Hi Dandi Crafters check out my first chipboard mini album. I hadn't ever made a mini album before. I am not a layout creating kind of gal. Actually this chip mini album is the closet I have ever gotten to a layout. Let me say never having done this before! WOW!! WOW!! It was a lot of fun, but boy is it time consuming. I don't know how many pages are in the average chipboard mini I think mine has a bit more than normal, but since the purpose of this mini album was to see the changes throughout the year I needed to do one for every month. The reason I did the album is that my daughter is really getting into scrapbooking and pictures so I thought that this would be a great way to start off. Even I can commit to 1 or 2 pictures a month. My daughter is very excited about it.
So much went into making this mini album, I used so many items it may be hard to name them all. Never having made a mini album and never paying too much attention to them I think mine is a bit different than most. It wasn't my intention to make mine different, it was just the end result.

For starters, I didn't want to spend the money on chipboard, I like to use cereal boxes when possible to be environmentally friendly, for my mini album however I would have IF there was anything out there that matched the idea I had in my head. I wanted to cover the year so that meant I need at least 12 pages. I had the idea of doing a flower that grew with the year. Now there very well maybe something out there like this but as I said I have never paid attention to mini album books so if there is something out there I don't know about it. I also didn't want my mini album so mini...LOL the biggest page is just under 8 inches round, the smallest just under 7. There are 13 pages in the mini album

How I created the book.
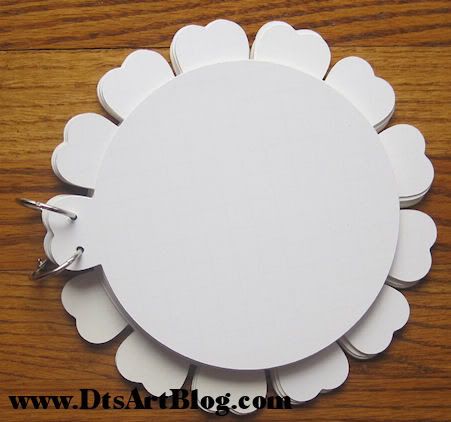
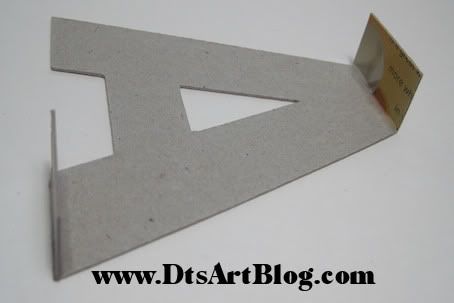
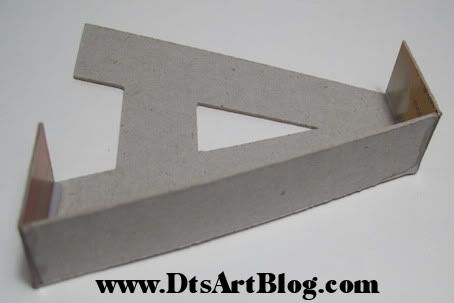
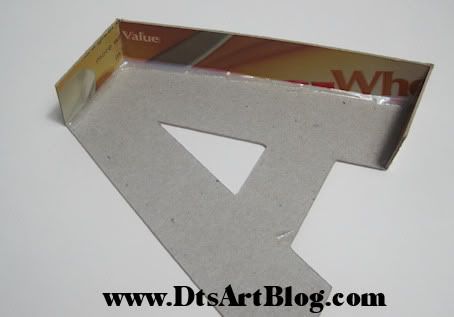
I created the template for the flower mini chip board using my image editor. Drawing a flower with a pedals was nothing daunting for me I can draw a little bit...LOL hehehehe as my boys would say I am not without skills...LOL. Once I had the basic design figured out and the pedals placed like I wanted them, the book pedals grow by one for each month, January starts out with 1 flower pedal and by the time you get to December there are 12 pedals, I imported it into, all you hardcore loyal Cricut fans look away for a minute:hehehe, Make The Cut. I cut out each of the flower page twice in white poster board using my deep cut blade. That took sometime to cut out 26 white poster board pages. I then glued the twin of each page so I could have sturdy double thickness and it would hold up leaving me with of course 13 pages. 13 not 12 because it has a cover. When the mini scrapbook was all cut out and glued it was all worth it because it was so so cute, and the concept of the flower growing with the year was sprinkled with enough, aren't I clever and it really worked thoughts to spur me on to cut out the 26 flower pages in designer papers and glue those on. Making sure that the designer paper was flat down on my mat if I was cutting the back side of the flower pages. It was much easier to flip my paper than to mirror my image each time because each flower page did require that I open a new design because the design grows by one pedal each month. LOL I only ended up cutting the wrong page 2 times. YEA!! me!! LOL
I used the following supplies
• K&CO KP Valentine Designer Paper
• American Girl Super Pad Paper
• Anna Griffin Paper
• Hello Cupcake Doodle Bat Font
• Cricut Cartridge A Child's Year
• Cricut Cartridge Hello Kitty
• Cricut Cartridge Create A Critter
• Cricut Cartridge Stretch Your Imagination
• Cricut Cartridge Doodlecharms
• Cricut Cartridge Home Accents
• Cuttlebug Machine and Embossing Folders
• Make The Cut Software Program
• Lettering Delights Weather Girl
• Lettering Delights Calendar
• Lettering Delights Balloon Craze
• Lion 125 from vector junky
• DtsArt SVG Design Files (that would be me! LOL)
• Embellishments from the following companies
• American Girl Dimensionals
• Recollections Dimensional Stickers Irish Stickers
• EK Sticko Irish Stickers
• K&Co Handmade Sweet Friends
• AMM Occasion-alls Bauble Gums
• glitter
• vinyl
• Window Cling
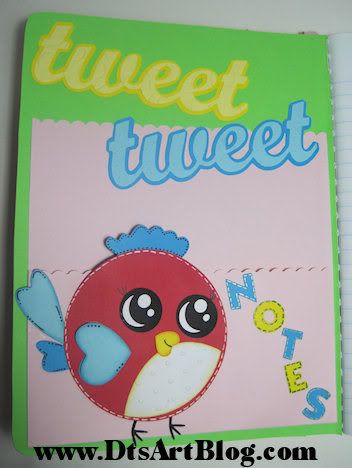
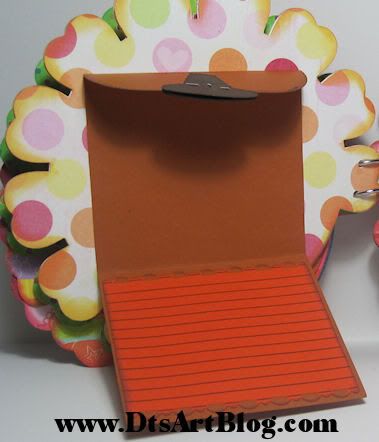
Each month has a little place for journaling and a picture or 2. Most you have to open the journaling area to see the pictures and journal area. All the month calendars are LD Calendar and I used  Hello Cupcake Doodle Bats to cut out the monthly calendars.

The cover was created using LD Weather Girl and Cricut Cartridge A Child's Year for the date. I cut the date using chipboard aka around here as cereal box. LOL

In January I used LD Weather Girl, the snowflakes are also from that collection. The journaling mat and picture mat are svg's that I created with my image editor and cut out using Make The Cut.


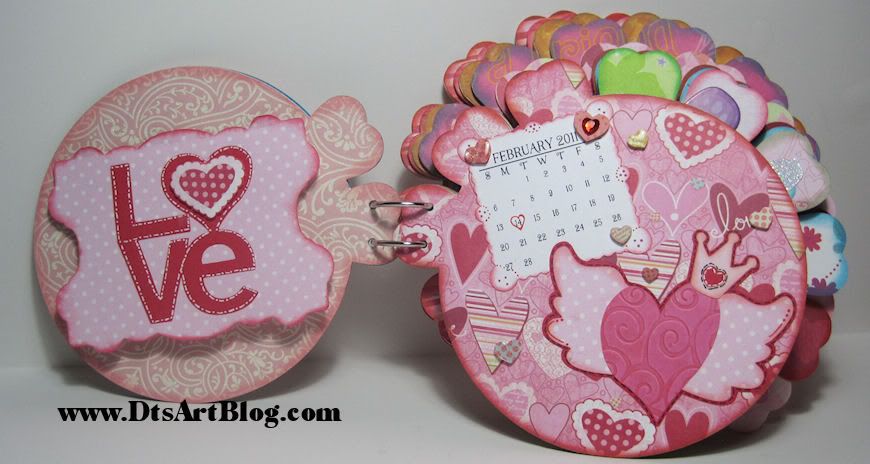
February was perfect to use the LOVE from Cricut Cartridge Home Accent. The little scallop heart is just one of the hearts I cut out from the designer paper I used on the opposite page. Again the journaling tag card was an svg that I created. You might recognize the heart with wings from Take Out Tuesday svg file that I offered. It was a popular download. The hearts are just some stickers from one of the companies named above.


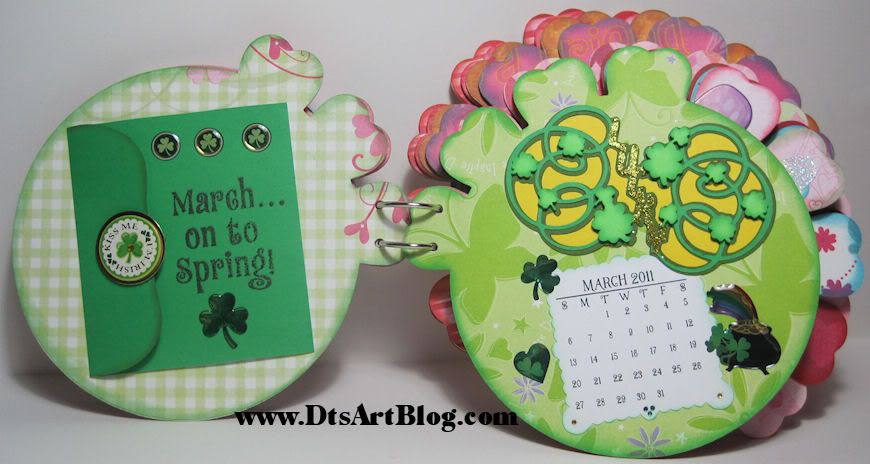
March was the hardest month for me to create I don't know why. I made the journaling svg and the Lucky Title Mat, which again you might recognize as last week's Take Out Tuesday. The rest are stickers that I purchase for this project because I was drawing a blank...Whew glad the whole project wasn't that hard. LOL

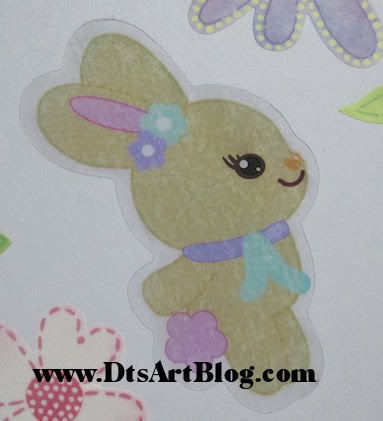
April was super easy, that one came to me quickly. I knew I wanted to use a bunny svg that I created.

I also printed the bunny out on window cling. I love to use window cling for a cute sticker effect but it seems an undiscovered treasure in the crafting community at least in the parts I hang out in. It is so fun and you get so many fun looks from it too. It's like ready to go vellum, except you don't have to worry if the glue is going to show. LOL The cloud and showers are from LD Weather Girl. The rest are stickers from one of the companies I name above.


May, well we have reached our birthday month so that was again real easy. I used LD Weather Girl again. I could have drawn my own little girl or I could have used either of the 2 Dress Up Cricut Cartridges however I used LD Weather Girl because one I find their new svg files easy to work with and 2 it looked like my daughter. LOL You don't find my daughter without a head band in her hair. The hair style is so perfect. Even my boys said hey it is a mini sister. LOL The journaling tag is again my svg. I had seen a few sites with cupcake cards but I have so many cupcakes that I have created over the years it is really hard to justify buying any. The gum drops are svg of mine too.

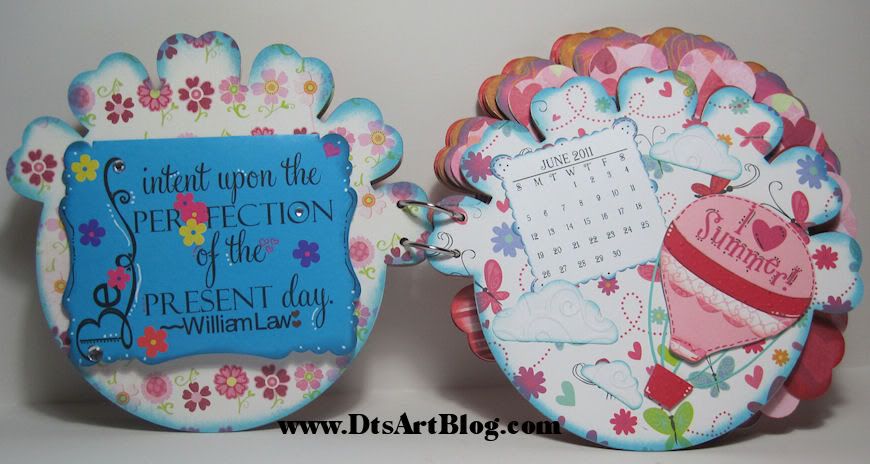
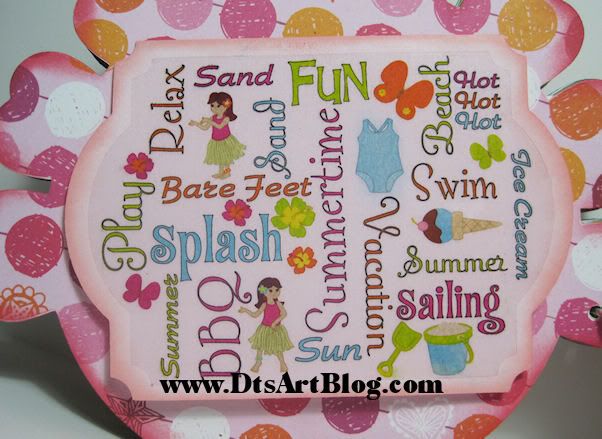
June was just a fun month to create. I love the quote and printed out to be used as my journaling tag. It seem so carefree and summer-y to me. LOL The Hot Air Balloon is from LD Balloon Craze. The clouds are from LD Weather Girl. That collection has a lot of great svgs in it.

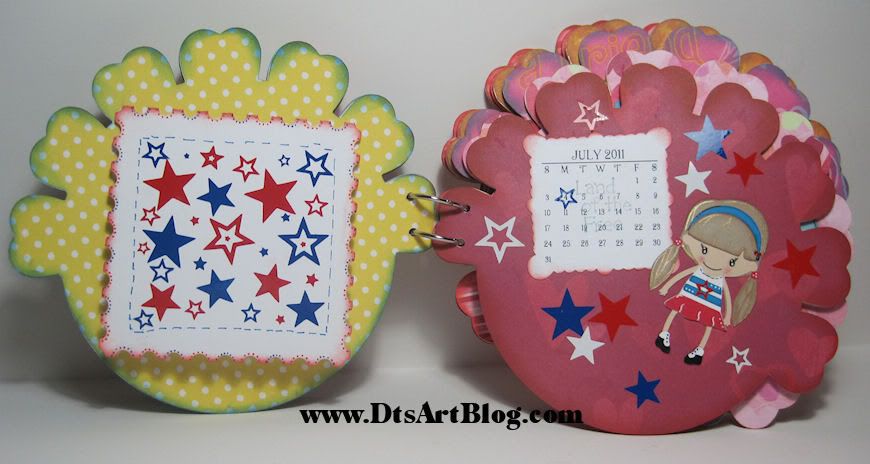
July I again used the LD Weather Girl set. I cut out the journaling tag from a stamp svg I made up and I just added vinyl stars all over the place. Simple and fun just like the 4th of July.


August, and sweet summer is beginning to set and our minds turn back to thoughts of school but not before we have a bit more fun. The summer title is just one I made by welding a fat font together. The ice cream cone is from Cricut Cartridge Stretched your Imagination.

The journaling tag for this month is one of my favorites out of the whole mini album. I just took a bunch of art that I had previously drawn for different projects and put them together with some summer words for fun, interesting, word art. I then printed it out again on window cling and cut it to fit my journaling tag.


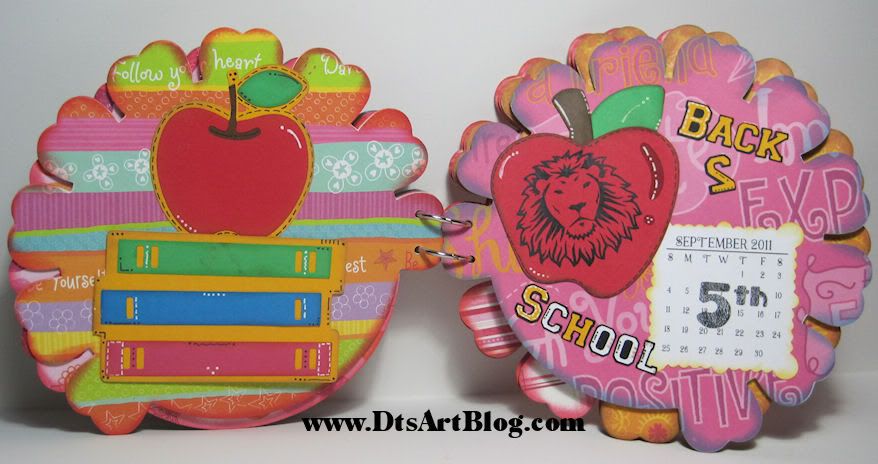
With September comes school so this page was a no brainer too. For the journaling tag I just used a card from Hello Kitty Greetings Cricut Cartridge. It was a perfect journaling tag for this month. I LOVE LOVE the apple on the Cricut Cartridge Doodlecharms so I used that on the adjecent page. Her school mascot is a lion so I used black vinyl and put a lion on the apple. It looks great! The lion came from vector junky.

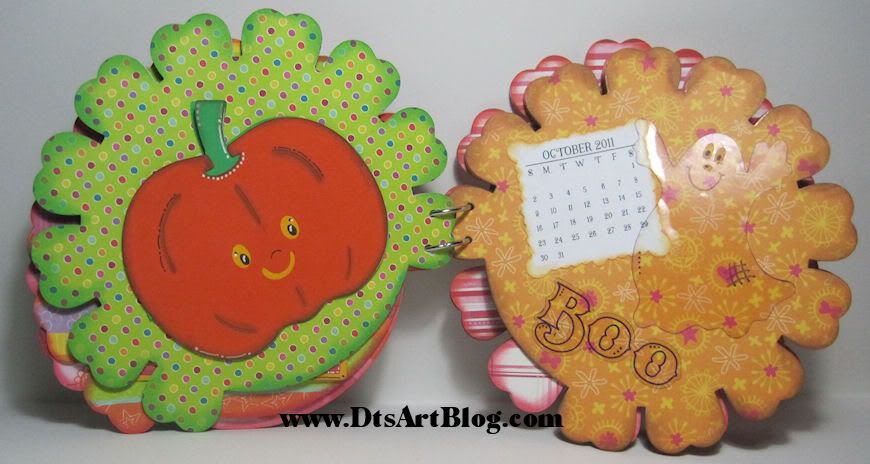
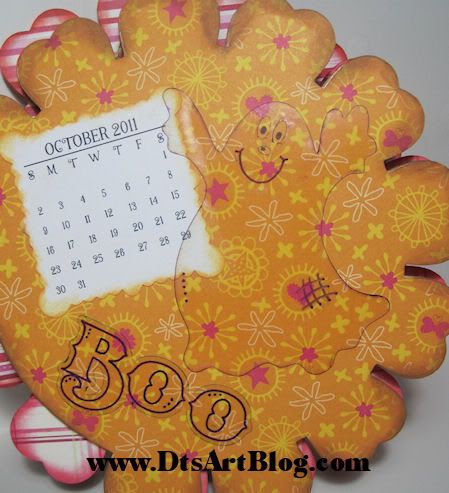
October is always a fun month. This one practically created itself. LOL I used Cricut Cartridge Create a Critter for the pumpkin card. I did a bit of editing to it to get it to look like I wanted it to look and work.

On the opposite page I used my window cling again and cut out a ghost I had created long ago and almost forgot about. Since I wanted the ghost to be a subtle I just inked the sides and drew in a few detail using a sharpie marker. He just looks super cute sitting on the page. The Boo is also window cling. Are you getting the impression you need to get some window cling? I hope so you will have tons of fun with it! I used a sharpie marker to write Boo with the Cricut. How fun is that Boo?


November was again another month that was easy for me, although I will be honest at this point what I was thankful for was that I was almost done! LOL so thankful that used a Sharpie Marker in my Cricut I wrote it out....on say it with me...Window Cling...get yourself some! I got to use that cute cute turkey from Create A Critter. He is so darn cute. The pilgrim hat is a Cricut Cartridge cut too but you will have to forgive me because at this point I don't remember which Cartridge. I probably got interrupted in the middle and had to go be Mom or Wife or some other real life happening collided with my crafting life. LOL

Ah December and here we are again at Christmas Time. Boy that came around fast. Look at that SWEET SWEET Snowman, isn't he beyond cute! It is from LD Weather Girl. That is such a great versatile svg set. You should go check it out! The snowflakes are in the LD Weather Girl set too! The sticker are listed above I am sure. I had them for forever. It was nice to get to use them. The present journaling tag is from Cricut Cartridge Hello Kitty Greetings.

Well that is it. If you are still reading this, frankly I can't believe it. This was a super long post! Well if you are still reading it, I should try to reward you for your stick to it-ness, kinda like me and this mini album...LOL
So if you are reading this tell me on this blog post what month was your favorite and why. I will give 3 loyal followers, because if you read this whole post you are loyal...LOL the svg download file so they can create their own flower mini album. MAKE SURE I HAVE SOME WAY OF CONTACTING YOU! IF NOT I WILL CHOOSE SOMEONE ELSE. This isn't just good for a through the year theme. It would be great for baby's first year, for your pregnancy, recording the first year of marriage. You can do a school career. The fact that it has 12 really opens up the possibilites of what kind of album you can create with it! I will draw 3 winners using a random number generator next Saturday March 5. Good luck!


Sunday, January 2, 2011

Altered Composition Notebook My Pink Stamper Design Team Challenge

Hi Dandi Crafters! Robyn over at My Pink Stamper is looking for 2 new design team members and is running a challenge. The requirements to enter the challenge and "try out" are:
•You will need to have a blog
•You cannot already be serving on a DT that has product that is a conflict of interest (most DTs are just fine as long as they do not sell product that is similar to My Pink Stamper Original Cricut Stamps idea)
•Your project must be made just for this challenge
•Post a pic on your blog with a full recipe along with what the challenge is about
•This needs to be a new project that you make just for this challenge
•Only one entry per person, please
•You must have either a Cricut or Imagine to serve on the team
•No experience necessary but you must have a love for the craft!

Challenge: Make a card, scrapbook page, or other Cricut project with your favorite cartridge using my favorite colors...
Pink
Green
Brown
(other optional color of your choice)

So my entry is an altered Composition Notebook. My daughter needed a new one, she loved the last one I made her and used it to pieces so it was time for a new one. I love the Create A Critter Cricut Cartridge. It is beyond cute. She liked the ladybug. I made her a bookmark before using the ladybug and she loved it so I decided the ladybug would be on the front. I learned from the last Composition Notebook that she needed pockets on the inside. She is alway writing, drawing, doodling, ect. and sticking them down inside. So I made sure to add pockets this time, which of course made more room to add more cute little embellishments.

Supplies Used:
Recollections Solid Card Stock
Heidi Grace Designs Baby Girl Decor Stripe
Ribbon
Daisies miscellaneous RAK
Cricut Expression
Cricut Cartridges: Mother's Day 2010: pin wheels, Mickey Font: notes, Create A Critter: Ladybug, Pig,
Make the Cut Software
Sure Cuts Alot
Cuttlebug
Cuttlebug Embossing Folders: Swiss Dots, D'vine Swirl, Perfectly Paisley, Seeing Spots,

Here is a look at the inside pocket where my daughter will put her tweet, tweet notes. You might recognize red bird from last weeks Take Out Tuesday's download.


Here is the back pocket. I knew I wanted to use the pig from Create A Critter, but I needed a pithy little saying to be able to use it so it would have a cute saying like the front pocket's tweet, tweet notes. It took me awhile but then it came to me, epigrams. PERFECT!! You know the "pig" in epigrams screamed out to be cut in pink. Husband got real sick of hearing how clever I thought I was to come up with that, but my daughter thought that it was super cute too. See the litttle pig in the frame, he is holding his own little epigram...but you can't read it because it is in pig latin....LOL, hehehe, see what my husband and family have to put up with on a daily bases. LOL!


One last little note about the pockets. They are cut at 8 inches wide by 10.5 inches tall. On the 10.5 inch score at 7 inches. Then on the 8 inch side cut a 1/2 inch off both sides until you get to the 7 inch score lines. Stop cutting at the 7 inch score lines. Score the flap that now sticks out at either side and glue. You now have your pocket for the inside, that was EASY PEASY!!

Monday, December 20, 2010

Christmas Reindeer M&M Treat Sticks

Hi Dandi Crafters! Today I thought I would share with your what my daughter is giving to her classmates. M&M Treat Sticks. These are so easy to make and put a smile on everyone's face. I used the little reindeer from Cricut Cartridge Create A Critter. The scalloped circle is also from that cartridge. The reindeer is cut at 2.5 inches and the scalloped circle is cut at 3.25 I believe. To attach the Treat Stick Bags we used a 1.5 inch circle sticker that says Merry Christmas from my daughter. It was a great way to attach the scallop circle. The kids can simply peel off the sticker to get to the candy opening without having to rip up the reindeer. I always keep some of these little bags laying around my craft room so I know that I can alway make up something on the fly without planning. The less planning I have to do especially around the holidays the better.
If you would like to purchase some of these little 1x8 inch bags you can do so at GT Bags.

Sunday, December 19, 2010

Monogrammed Post It Note and Pencil Holder Teacher Gift Christmas 2010


Hi Dandi Crafters. Today I want to share with your what my daughter is giving her teacher, a post it note message center and a Pencil Holder. The post it note message center is made using a 4x6 frame. Mrs. H likes purple and polka dots. I have noticed often when I see Mrs. H around her desk she is often searching to find a small piece of paper to write down information for a parent or 2. I am hoping this will help her just a little bit with that task. Last year we gave a pencil holder to her teacher Mrs. D and she really seemed to like it and used it so we thought Mrs. H might like one too. I etched an H on the glass. If you look at the picture you will see the H. It looks very pretty in r/l.

Happy Crafting everyone I hope all your Christmas Crafts are coming out like you want them to!

Friday, December 17, 2010

Jolly Holiday SANTA Letters


Hi Dandi Crafters! How are all your holiday projects coming? I just finished this one and I am please with how it turned out. Aren't these Santa letters just too too cute. I made them and I was surprised how easy it was and how well they turned out considering I hadn't done this before. This wasn't from a tutorial that I read or anything. Everything is from my own trial and error experience... LOL It came from the fact that with 4 kids I have TONS of cereal boxes and I started playing one day. LOL


I used my SCAL enabled cricut to cut each letter out twice using a deep cut blade. I taped the cereal box down even though my mat was still very sticky. I cut each letter multiple time. I used Arial Black for the font. I cut each letter at 8.5 inches high. I then cut strips that were 1.75 inches high so that each of my letters would be 1.75 inches thick. I measured each part of each letter and cut them as wide as they needed to be, remembering because they are chip board that they do have mass so I had to allow for that thickness. The S was a little stinker to GLUE!! I will tell you that much. The straight edge letters were actually pretty easy! To glue the letters I used Judikins Diamond Glaze. As a rule of thumb I don't use this to glue things however I knew from using Judikins Diamond Glaze that it set pretty quickly although not so fast that you don't have time to work with the chip board. When it drys completely it dries glossy which really doesn't matter however it has a STRONG hold when it is totally dry!

After each letter was dry I spray painted them white. It wasn't necessary really however I find spray painting faster and a much more even finish. I then painted the sides of each of the letters S N A red I painted A and T silver. I then covered each letter with K&Co Secret Santa Designer Paper. Remember if you want the same paper for the front and the back as mine are You must MIRROR the second letter. I cut each letter out in the paper again at 8.5 inches tall. There are no pictures of the back although the paper are the same just no little characters on the back.

 I use Mod Podge Glossy to attach and seal each paper to the letters. I used about 3 coats. I like this look the letters look very finished, but not overtly glossy even though I used a glossy finish. I then use the very cute and my brand new Cricut Cartridge Jolly Holidays to decorate each letter. My new FAVORITE cartridge The reindeer with the gem nose is from the Cricut Cartridge Create A Critter. I love that reindeer! Most of the die cuts are cut about 2-3 inches high.

I used pop dots to give some layering depth to some of the die cuts. I also used circle punches and 28 gauge wire to make action wobbles on the fly for some spring action movement. This adds a lot of fun to my Santa letters. There you have it a pretty inexpensive way to add some holiday cheer not to mention that this project is LOADS of fun!


Challenges I entered:
Fantabulous Cricut Crawl

One last picture from the side so you can get an idea of the depth of the letter.


Edited to add assembly photo for those that have questions.
I have the letter A cut out. Those that have straight edges are easier than those letters that have curved areas.

In this first photo you can see I have my Arial Black A face cut out. I also have a couple of pieces of the sides. Notice that each of the side pieces although different lengths are the same width. This is IMPORTANT. You have to decide on how thick you want your letters to be then stick with that measurement. I made my letters 1.75 inches thick. It doesn't matter how thick you make your letters just that you pick a size and stick to it.

In the second step I glued the top of the A. You want all pieces on the top and bottom to be the exact measurement of the segment of the letter that you are working on. In this step I am working on the top segment. It needs to be the EXACT length of the top of the A. I cut my side pieces close to what they need to be however I like them a bit longer than they need to be because I take my scissors and very patiently cut off tiny amounts until my sides measure exactly the length of the segment of the letter I am working on.
I think I need to repeat that last part in case you just skimmed over it. The top and bottom parts of the letter, in other words the horizontal pieces of each letter need to be the exact length of the segment.


A different view of it. In the picture you should notice that the top segment that was glued was glued to the letter itself. It is not glued adjacent,next to, the face of the letter. You glue it to the back of the face of the letter so you do not change the original face dimensions of the letter. Notice that the top segment starts and tops with the top of the face of the A. It meets both open sides flush.

In the third step I added a bottom piece. Again you want this segment to line up evenly with the segment you are doing.


I know you are wondering why I kept going on at length why your horizontally pieces need to be exact in the length matching each segment of the sides. It is because now that we have started working on the vertical segments as shown in the next picture they are no longer going to be the exact size of the segment but rather we are going to take our scissors and patiently trim the ends of the side segment pieces to fit in between the horizontal segment that we were so careful to make exact.

You do the same to each segment of your letter making your way around the whole letter, remembering to make sure you also do the inside middle triangle part of the A. I usually did the insides of the letters after I got a complete side finished. Here is the completed side from another angle.


As you can see by this last picture, the 3D letters stand pretty easily and sturdy even without being fully assembled. This is due to the fact that the horizontal segments are flush and even with the face of your A. All assembling sides need to be flush with the edge but not hanging over.
When you are done assembling all the sides of your letter. You simply drop the second face of your letter on to the top and let it dry. I hope this helps you assemble your own letters. Honestly they really are pretty easy to assemble. I just wanted to give you the benefit of what I have learned when assembling my letters.

Wednesday, December 8, 2010

My Christmas Reindeer Front Door


Hi Dandi Crafters! I wanted to share my Holiday door with you. I used vinyl to decorate it. Some of you may notice the red nose reindeer as the SVG file download from Take Out Tuesday a couple weeks ago. I just made him EXTRA LARGE and cut him out using my 12x24 mat. The Merry Christmas is from the Cricut cartridge Storybook. The snowflakes are from the retired Cricut Cartridge Christmas Solutions. I was very please with the way it turned out. It was my first Extra Large vinyl project and it turned out to be easier than I thought.

Tuesday, December 7, 2010

Take Out Tuesday Lip Balm Holder SVG Download December 7

Hi Dandi Crafters! Happy Take Out Tuesday to you. I hope your holiday crafting is going well. Mine is well under way but I am always surprised how long it takes to get all the projects done, LOL! Today's Take Out Tuesday Download come from my own crafting needs this week, a lip balm holder.
My darling daughter is very into Christmas, all of it. I know that every kid enjoys Christmas; I have 4 kids, but my daughter just LOVES LOVES it! She LOVES everything about it, the decorating, the giving gifts, baking, the holiday clothes, the crafting. LOL as I type this post I hear her in the other room singing Christmas Carols. To look at my daughter you would think everyday in December was actually Christmas Day. LOL

Anyway, this year she is giving her little girl friends Christmas Lip Balm, so I made this cute little lip balm svg cut file. The lip balm file is super easy to put together only 2 layers. Again you will need to get your magnifying spectacles out and get in a well lit room so you can see the score marks on the lip balm cover. The inside layer is scored a bit deeper but you may still need a well lit room to find them. I like to have score marks when I do a project I just can't stand it when it leaves noticeable marks the paper. The reindeer you see decorating the front is from Circut Cartridge Create A Critter. My daughter is putting one on each lip balm holder for her friends as a Christmas Ornament.

The finished project as is it seen here is about 2.75 inches wide by 3.5 inches in height. This file was saved in SCAL 1 so it can be used with SCAL 1 or SCAL 2. The svg file is included so you can use Make The Cut with it. The file also includes terms of use and useful information such as exact measurements.

The zip file includes:
•Outside Lip Balm Cover (shown in red)
•Inside Lip Balm Cover (shown in white)

Take Out Tuesday can be downloaded on Tuesday and Wednesday. On Thursday we throw out the left overs. I provide Take Out Tuesday Downloads as a thank you to my followers and regular readers. If you are not already a follower you may want to consider becoming one so you do not miss any more Take Out Tuesdays.

Download: No longer available. Please join us next Tuesday when Fresh Take Out will be posted. Be sure to become a follower so you will not miss anymore Take Out Tuesday Freebies. Take Out is posted for my followers to download on Tuesday and Wednesday, on Thursday we throw out the left overs.


Did you miss the download? You may want to try this Holiday Gift Card Holder post. The Holiday Gift Card Holder Link will remain active until Christmas.


Related Posts with Thumbnails