Search DtsArt Blog

click to visit www.dtsart.com

Sunday, August 28, 2011

Blog Giveaway Winner!


Hi Dandi Crafters. It is time to draw for the blog makeover winner. The random number generator chose number 5. Congratulations to Rachelxx. You have 7 days to claim your prize. Use this contact form.


Friday, August 26, 2011

Altered Composition Book: The look for less


Hi Dandi Crafters. My new obsession is Pinterest. If you haven't found Pinterest you totally need to check it out! It is totally addicting. I needed to make a composition book for my daughter. Well on one of my many Pinterest adventures I found this totally cute altered notebook. I am a big fan of turquoise and red. You may have guessed that if you are familiar with my past blog layout of Blue Jays and Cherries before I recently change it.
I liked pretty much everything about this altered composition book. It originally came from the Cricut Blog, so I clicked the link and read that the paper was from the manufacturer Bella Blvd. Well me being a graphics designer, I had pretty much all those patterns, hounds tooth, notebook paper, and even had a keyboard layout all on my computer from various jobs and projects, although not in those colors at all. I changed the colors to the turquoise, red, yellow theme and printed out the patterns on card stock.
I don't have either the Cricut Feeling Groovy Cartridge or Cricut Elegant Edges Cartridge. What I do have is a pre-lawsuit Cricut Expression, which means I have both SCAL and Make The Cut third party software. I ♥ Make The Cut. This is where the original composition book and my look for less composition book parted ways. Even though I don't have the Cricut Cartridges use in on the original project. I had just finished about a week or so ago making this oh so cute little loopy frame.

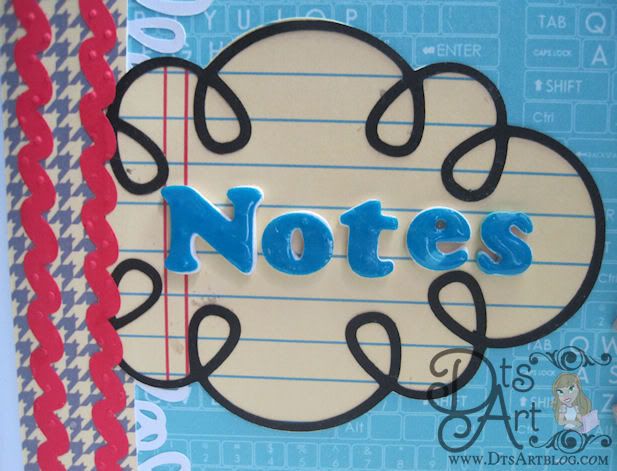
Look At it. Isn't cute? I also recently made the little loopy fringe. That came out darling too. Although I have used ribbon on altered composition books in the past I can't say I love ribbon on composition. However, I thought maybe some ricrac would be cute. I can't believe I thought that because years ago when I was hanging out in the eBay Children's Boutique World, ricrac was on everything. I grew to dislike it and thought, "If I never see another piece of ricrac it will be too soon". Guess I was wrong, who knew. LOL I played around with a my graphics program and Make the Cut and was able to come up with some ricrac that I was pleased with.
I then made some 3D letters, glossed them up and spelled out Notes. I have lots of scrabble tiles which to craft with and I thought that would be a fun finishing embellishment. PapricaK is a family joke and my daughter laughed when I showed it to her. ;-)

I had everything on hand that I needed to alter the compostion book but if I had to add up the supplies needed I would say that it would be around $3.97 that includes the big expense of paying $1.49 for 12x12 vinyl. LOL
If I had to purchase everything that was used to make the original...let's say that would have been one might expensive altered composition book. My point is use what you have. Found items usually tend to be the cutest and most interesting on altered compostion books.

I have made several altered notebooks in the past I got really tired of having to always cut and trim so I made a template in Make the Cut to cut out with my cricut. Here are the measurements if you are interested:

The main piece of the composition book if you are not trying to cover the black spine is 6.75 wide by 9.75 in height.

The corners around the opening of the composition book are rounded at 0.75 inches
If you want to cover the whole front, not really possible without wrapping around but you can cover most of it nice and tidy.
7.375 wide by 9.750 height
with the spine corners rounded at 0.200 inches

If you want to cover the spine it is
2.0500 wide by 9.750 height
Opening the composition book to the middle and laying it flat will yield you the best results. (I used white vinyl on my spine for a fun look.)

Accent piece covering the spine partially is
1.20 wide by 9.75 height

I like to use modge podge to applied to the covers to adhere my papers and or card stock. I might apply a little modge podge to the corner and edges of the main paper and or card stock but I don't coat my paper in modge podge.

All composition book measurements vary slightly from manufacturer to manufacturer but not too much. Overall these will yeild reliable results on many of the brands out there. If you are super picky you should measure yours. ;-)

Well if your still reading thanks for blogging along!

Wednesday, August 24, 2011

Just Like Real ~ Play Disney Princess Checks


Hi Dandi Crafters. Awhile ago when we were discussing ideas for gift idea for the kids in our family. It came up that my niece really liked to play with her mommy's and Nana's checks. I thought it would be fun to get her some checks of her own. I looked high and low on the Internet, in stores,everywhere. There just wasn't that many out there. I tried buying them from those places that print check but turns out they will not print checks without you submitting a check from your bank account. I found a FEW check aimed at children to play with but they were beyond ugly. I needed something CUTE. After searching high and low I came to the conclusion that I would just have to make my own. I can do this right, after all I am a graphics designer. I had several images of princesses, from coloring books I had purchased over time on my many trips to Disney World. I just turned them into digital stamps and colored them. I referred to my checks for the size and then made the rest up using both real and made up information, mostly made up. LOL
When I was visiting with her the other day and she mentioned she was all out of checks and would really like some more. I had everything from the first time I made them. I just updated her info and sent some more off to her.
The checks are just darling in person. I even made a check book cover and check registry. I made 100 checks. I printed 3 checks per 8.5x11 sheet of paper. There are 6 different style princess checks, Aurora, Cinderella, Snow White, Ariel, Jasmine, and Belle.

 I used my cricut assisted with Make the Cut software to cut out each check. I tried having the cricut cut the perforations needed to tear the checks out however I have a cutterpede that perforates. I found that I could perforate them faster in my manual perforater and I preferred the results too. Although there was nothing wrong with the job the cricut was doing. It just took longer for the cricut to perforate each check then cut it. If it just cut each check it went fast, as did the hand perforating. I left just short of a .25 inches at the top of each check so I could staple them. I have a heavy duty stapler that will staple up to 160 pages. Each book of checks has 50 check. I used a Manila folder to cut out the backing of the check. I also used white Duck Duct Tape to cover each book of checks so they looked more finished.

I used a plastic hand calendar cover to make the check book holder.

You know you have to keep track of the checks you write so I made a little registry for it. It was easy really just some lines on a paper.

They are beyond cute. She will be happy to get the checks in mail, but yet who isn't happy when checks come in the mail. LOL

Thursday, August 18, 2011

My New Laptop Skin & Tutorial: How to Round Corners in Make The Cut


Hi Dandi Crafters. Check out my new laptop skin. I took my laptop from fab to drab in no time. My computer is a black Acer laptop. If you are familiar with Acer Laptops then you know that the Acer name is stuck right in the middle of laptop cover. It just isn't very cute.


So I decided to dress it up a bit. I took white vinyl and covered the whole outside. I LOVE looking at a blank white canvas. My thoughts just swim in the dream of possibilities. This is what I came up with.

While I was sharing my new laptop skin on the discussion boards someone asked me how I got the rounded corners. She said she could never get hers just right. I will be honest I don't even think about how to round corners. The corners needed to be rounded so the skin would fit my laptop so I rounded them. Most of the time when I start creating I don't think of the initial basic steps. I just do them. They are just something that I have to do, have to endure, to get to the fun creative stuff. Right now this is funny to me because I am trying to learn to use illustrator better. When I am following a long in tutorials, I find myself saying wait you didn't explain how to get to that step. You assume I know more than I do. It is discouraging, because sometimes you do a tutorial just to learn the basic thing that they gloss over in the tutorial. I am sure that they gloss over it for the same reason I do. That part is just routine to them. They do it automatically and aren't even thinking about that part. It is rather like saying to someone, "Oh this is so good, here take a bite." It never occurs to you to explain how to take a bite. You just want to share the exciting, good stuff with them. Yes I know that in reality everyone knows how to bite but it does express my point perfectly. LOL
So I thought I would do a little tutorial for you on how to round corners. This is how you do it in Make The Cut. However if you ever need standard rounded corners in any program you are working in these basics will work. I know that there are LOTS of programs that will round corners for you. I have some of those programs and I let the program round the corners for me whenever possible. Make the Cut has a couple of rounded corner shapes in the shape area. However if you need rounded corners to be an exact size those shapes may not help you.
This is the basics of how to get an exact rounded corner.
These basics will work in any program. You just need to know in the program that you are using, how to draw out your basic shapes, align, cut and how to join/merge. That is it. All your basic image editors have all of these features. You just need to know where to find them in the program you are using.
1.You draw out your rectangle or square.
2.Draw out your circle in the size that you want your rounded corner to be. Rounded corners most of the time are pretty standard. You have 1/4, 1/2, 3/4, and 1 inch. You can certainly make your rounded corners to be any size you want. You can make them 0.3567 if you like. If you are trying to have rounded corners that you are trying to match, rounded corners tend to be pretty standard in manufacturing. Say you want a 1/2 inch. That was what my corners on my laptop cover are rounded at. You just make a 1/2 inch circle. LOL you want a 1/2 inch circle not half of a circle. LOL ;-)
3. Make sure you copy and or duplicate your 1/2 inch circle so you have a total of 4 circles, one for each corner.
4. Move the circles to each corner of your rectangle
5. You will want to align the circles to your rectangle so they match perfectly. Align:
a. first circle to the top left of your rectangle
b. second circle to the top right of your rectangle
c. third circle to the bottom left of your rectangle
d. fourth circle to the bottom right of your rectangle.
6. Now that the circles are aligned you will notice that there is a corner tab part of the rectangle sticking out behind every circle in the corner. You want to cut off the tab in each corner.
7. You need to notice that there is a place in each corner where the circle and rectangle line up perfectly on either side of the circle. This is PRECISELY where you want to cut. Cutting the rectangle too high or too low will give you a bump or two in your rounded corners. YUCK!! who wants THAT!!
8. Now that you have cut the corner tags off you should see that you are just steps away from having uniformed and exact measured corners. Now all that is left is to join/ merge the circles with the rectangle.
9. There your done. You have prefect rounded corners on your rectangle or square.
Hope this helped you some!


Monday, August 15, 2011

Blog Hop Winners Announced

Hi Dandi Crafters! It is time to announce the winners in the blog hop. Thank you to everyone that took time to comment.
The first winner picked using random.org is #6.

Joelene said:
Congratulations to Joelene you have won your choice of either 2 free svg die cuts or 2 free digital stamps from my website, DtsArt.com.

The second winning number picked was #10
Ellis said:

Congratulations to Ellis you have won your choice of either 2 free svg die cuts or 2 free digital stamps from my website, DtsArt.com. Both winners have until August 22 to claim their prize. Thanks for playing along.

Friday, August 12, 2011

Got Lunch? Lunch Box Decorated with Vinyl Food


Hi Dandi Crafters. Well it is that time of year again. No not back to school, that will come soon enough, buying school supplies. Every year it starts the same, with the school lunch box. It sounds like an easy enough task, pick one out, take it to the cashier and pay. Oh if it were only that easy. To make a long story short, about 2 or 3 lunch boxes were put into the cart but we ended up coming home with this one. I am happy because it is made of hard plastic which is much easier to clean, and doesn't stink 2 weeks into the school year,  unlike those soft plastic material counterparts. She is happy because it was pink and I told her we could decorate it and make it look cute when we got home. Mission accomplished! If you didn't know better you might think I purchased this lunch box like this. I hadn't a clue how I was going to decorate it when I told her we could make it cute. I was actually thinking Tinkerbell, or Hello Kitty. Then I got to thinking, it would look cute with food on it. Yea, I could draw some dancing food with  faces. Then I thought some more," Didn't I download some kind of milk with a face on it from Lettering Delights?" I did, look at that it is a whole set, 'Oishii'. But I really want food with faces,arms, and feet. Maybe I should just draw my own, it wouldn't take that long, but I really wanted to 'get it done'. Well thanks to Make the Cut now having the LD browser I looked around because I remembered seeing some food with feet on it. ;-) Yep sure enough 'Stuck On You' has arms and feet. That is more like it. The 'Stuck On You' Set has happy faced food with arms and legs. Oh perfect it even has peanut butter and jelly bread already! However there is no milk or dessert food and I would have to purchase the 'Stuck On You' set. It isn't exactly what I want. Now do I just bite the bullet and draw exactly what I want or do I just purchase the set and fiddle with it. I decided to purchase 'Stuck On You' from Lettering Delights. I fiddled with the 'Oishii' and 'Stick On You' sets which didn't take any time at all because I knew what I wanted and knew how to do it in a few easy steps. There you go, one super sweet lunch box. I couldn't be more pleased how this turned out. The vinyl colors I chose matched the colors of the lunch box perfectly. The pink got lunch? is the exact color of the back of the lunch box. The turquoise color I used for the milk is the same color of the drink bottle lid and lunch box clasp.
What I used:
Bobble lunch box, purchased mine at Target.
Lettering Delights Oishii
Lettering Delights Stuck On You
All Vinyl is Oracal 631 (aka Cricut Vinyl)
Colors Used:
Light brown
Beige
Black
White
Pink
Soft Pink
Bubble Gum (soft pink and bubble gum are very close in color. You could choose to use either for the cake.)
Carnation Pink
Violet (some sites I have seen also list this as purple)
Lilac
Geyser Blue
GotMilk Font

Wednesday, August 10, 2011

All New Blog Look!


Hi Dandi Crafters, I have a new blog look! I was so so over the cherry and blue jay layout. I decided to give myself a new look before I jumped in and got busy with my design team again. If you have sent in an application to be on my design team or as a guest designer you should be hearing from me soon. If you haven't sent in your application and want too. You can it is not too late. Click here for the post to read about it.
So what do you think of my new blog look? I like how bright and cheery it is. I love turquoise, orange and brown together. I actually made the fun scroll as an svg file but thought oh it would look darling as a blog design element too. I finally added some top navigation. I know I had been needing that for awhile so I made sure I added. Another thing I added since I have give aways on my blog, I added numbers to post comment. That will help me. No more counting for me. You can see the cute number displays here. Other things I added a new go button for search, title highlight, new signature,post divider.
Leave some love and tell me what your favorite thing is from my makeover and you may get a new look too. I will draw 1 random comment and give them a blog make over. For blogger.com only. Includes 1 logo,1 background, blog button with code, and a signature image, and free installation of the blogger template. I will work with you on the theme you would like. Theme will not include any original character creation or complex original art. Be sure to leave an email address so I contact you. Winners will be posted on August 28. Winners will have 7 days to claim there prize. Good luck!

Sunday, August 7, 2011

Summer Scrappers Sale at Etsy and a Blog Hop

Hi Dandi Crafter! I have joined with some of my esty friends to have a blog hop and a esty sale. Everything has free shipping for all US residents so be sure to check out my esty shop. Visit the esty shops and check out all the awesome craft-i"ness" LOL  and be sure to hop to all the blogs and comment there will be prizes along the way! If you arrived here from Endless Inkabilities then you are in right place. The next stop is Twin Tornados Mommy. If you get lost along the way here is the blog route.

Clare Dempsey Scrapguild http://www.etsy.com/shop/scrapguild
Cricut Crafty Clare http://www.cricutcraftyclare.blogspot.com/

Christie Hund A Creation by Christie http://www.etsy.com/shop/acreationbychristie
Creations By Christie http://creationsbychristie.blogspot.com/

Anna Fearer More Paper Than Shoes http://www.etsy.com/shop/morepaperthanshoes
Anna Fearer http://www.annafearer.blogspot.com/

Korie We Will Always Have Paris http://www.etsy.com/shop/alwayshaveparis
We Will Always Have Paris http://www.wewillalwayshaveparis.com/

Fran All Stickered Up http://www.etsy.com/shop/allstickeredup
The Twin Tornados Mommy http://thetwintornadosmommy.blogspot.com/

Sue Stoughton It’s Always Fabulous http://www.etsy.com/shop/itsalwaysfabulous
Another Fabulous Day http://www.suesfabulouslife.blogspot.com/

SheilaOx SheilaOx http://www.etsy.com/shop/sheilaox
Sheila’s World http://sheilaoxley.blogspot.com/

Kim Endless Inkabilities http://www.etsy.com/shop/endlessinkabilities
Endless Inkabilities http://www.endlessinkabilities.blogspot.com/

Dardi DtsArts http://www.etsy.com/shop/dandithings
DtsArt Blog http://www.dtsartblog.com/

Fran All Stickered Up http://www.etsy.com/shop/allstickeredup
The Twin Tornados Mommy
Now for a giveaway of my own. Make sure to visit my esty store and tell me what your favorite item is, by posting here. I will draw 2 random comments and give them their choice of either 2 free svg die cuts or 2 free digital stamps from my website, DtsArt.com. Be sure to leave an email address so I contact you. Winners will be posted on August 14. Winners will have 7 days to claim there prize. Happy Shopping All ;-)

Wednesday, August 3, 2011

DtsArt Design Team Call for Fall '11 Digital Stampers & SVG Diecut Users Wanted

DtsArt Design Team Application
Guest Designer Application
Hi Dandi Crafters! Are you a fan, would you like more DtsArt Designs to work with for FREE? Then join my Design Team! Applications are being accepted now until August 28,11. Can't commit to a whole term but would like to play with us a bit then apply to be guest designer. Click the link above and fill out the Design Team Application if you interested. DtsArt is currently looking for some creative designers that love to work with digital stamp and SVG diecuts.
The Requirements
Have an active blog
Promote DtsArt on networking sites and enter in challenges
Can commit to the fall '11 term that runs from September to mid December.
Must be able to complete 2 projects a month
Participate in blog hops and challenges when we have them
Fill Out the DtsArt Design Team Application in full. Please see link above.
Must upload DtsArt Projects to gallery on diecutdesigner.com,cutandcreate.com, and smartbuygal.com

The Benefits
Free Digital Stamps or SVG Diecuts depending on which team you join.
Design Team Badge
DT badge for your blog. Different one for each term
Exposure for your design team work
DT members are allowed to sell any project samples made with DtsArt items More details will be given to those that are accepted
DT members receive help in improving their online appearance. More details will be given to those that are accepted.
Related Posts with Thumbnails