


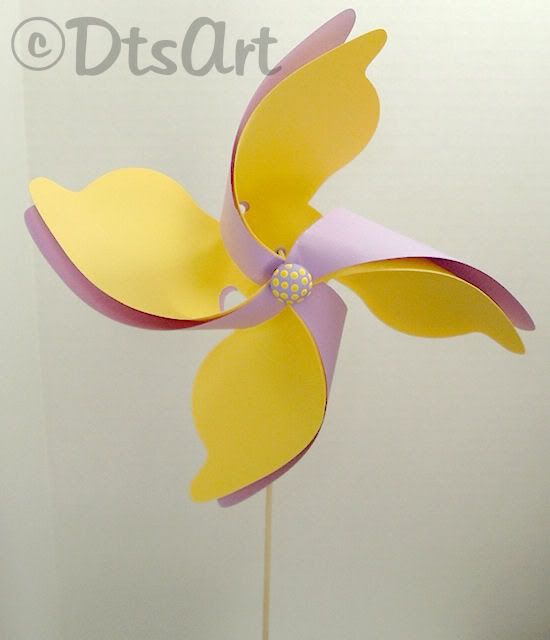
I recently purchased the Limited Edition Spring Collection Mother's Day 2010 Cricut Cartridge. I LOVED that it had a pinwheel. Nothing says spring fun like a pinwheel! I actually already had a pinwheel template on my computer I just wanted the convenience that the cart offered. Although it is a cute cartridge I really haven't cut anything else from it. LOL. As I was looking around the web seeing others ideas about pinwheels I kept coming across post that said it didn't really spin. WHAT!!??!! It doesn't count as a pinwheel if it doesn't spin does it? Yea, that is what I thought too. I LOVE when you agree with me. LOL
Well I got the pinwheel all assembled and it DOES SPIN! Whew what a relief. I think maybe some don't understand the assembly of the pinwheel so I thought I would post my solution. There are other assembly instructions out there this is just my way.
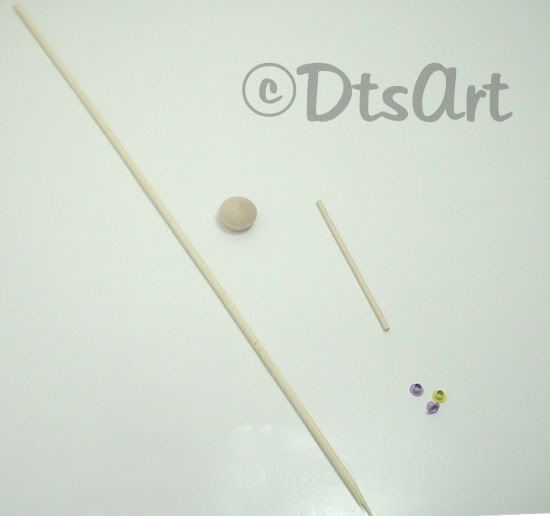
What you will need:
I cut the pinwheel at 7 inches
The 2010 Mother's Day Cricut Cartridge
Drill
1/16 inch drill bit
3/32 inch drill bit
CropODile or other eyelet setter.
1~ Wooden Skewer (I got mine at Target 100 for dollar)
1~ 1/2 wooden button. (I got mine at AC Moore Craft Store in the doll/wood section)
1~ 3/32" x 2 5/8 Mini Dowel (I got mine at Micheal's in the wood/dowel section)
3~ 1/8 round eyelets OR
2~ 1/8 inch round eyelets & 1~ 3/16 inch round eyelet if you are going to use 2 peices of paper or card stock.
A super glue or fast drying wood glue (I used Scotch Super Glue Gel)
See picture below of the wooden peices and eyelets to get a mental picture.
1. We need to take our wooden skewer and drill a hole towards the top about 1/4 inch from the top. Right in the middle use the 1/16 drill to get it started. Take care at this time to make sure it is straight and in the middle. Once it is started you will need to change to the 3/32 inch drill bit. You want to drill well into the wood skewer but not all the way through it. Take your mini dowel and sort of test the depth. You want the dowel to sit nicely in the wood skewer. Next using the 3/32 drill bit drill a hole in the middle of the flat side of the wooden button. Again you do not want to drill it all the way through. You want to drill it to be about the same depth as you drilled the skewer.
2. Take your mini wooden dowel and fit it into the wood skewer and make sure you have a good fit. When you are sure you do place a tiny drop or two of super glue into the hole you just drilled and quickly place the mini wooden dowel in the hole and support it while the dowel sets so you get it straight. It shouldn't take long if you use super glue. Due make sure you are only using a spot of glue. If you use too much glue and it gets on the dowel in other places your pinwheel may not spin smoothly.
3. Now set the skewer with the newly glued dowel aside for a bit and work on the pinwheel. Take one of your 1/8 eyelets and set it in the middle. Make sure not to grab any of the arms yet. You just want to set the eyelet in the middle.
4. Now we want to gather all the arms and set them. If you are using 2 peices of paper or card stock you may have to punch bigger holes so the 3/16 eyelet will fit in the arms. If you are using just 1 peice of paper or card stock then you should be fine. Make sure not to set the arms with the back that we set previously. We are setting the arms together as a group all on their own. If you are using 1 peice of paper then this probably went pretty smoothly. If you used 2 peices of paper or card stock then you are probably wrestling with it a bit. I used another mini down to collect all the arms. It was sort of like wrestling an octopus. LOL
5. Now that we have the pinwheel all set with eyelets, we want to slide the pinwheel on the mini dowel. Pick up your skewer and drop the final eyelet on the mini dowel with the wider end of the eyelet out so it will touch the pinwheel after you put it on there. Now put your pinwheel on the mini dowel with the arms facing out.
6. We are almost finished with the pinwheel. We just need to put on the front button. You don't want to get carried away with the glue here. If you get glue on the wooden dowel where the eyelet is trying to spin it may not spin smoothly. Place a couple of drops of glue in the hole that you drilled in the back of the wooden button. Now hold the dowel straight while also holding the pinwheel away from the glue so it doesn't dry to the dowel. Again if you are using a super glue this shouldn't take long. I think I held mine my pinwheel for maybe 2 minutes just to make doublly sure that it was fully dried.
7. Your done. If you plan to put in foam to make a pot of pinwheel then leave the skewer as is, however if you plan to give it to your little ones cut off the point so that it has a flat bottom.
If you have questions feel free to Contact Me

I cut the pinwheel at 7 inches
The 2010 Mother's Day Cricut Cartridge
Drill
1/16 inch drill bit
3/32 inch drill bit
CropODile or other eyelet setter.
1~ Wooden Skewer (I got mine at Target 100 for dollar)
1~ 1/2 wooden button. (I got mine at AC Moore Craft Store in the doll/wood section)
1~ 3/32" x 2 5/8 Mini Dowel (I got mine at Micheal's in the wood/dowel section)
3~ 1/8 round eyelets OR
2~ 1/8 inch round eyelets & 1~ 3/16 inch round eyelet if you are going to use 2 peices of paper or card stock.
A super glue or fast drying wood glue (I used Scotch Super Glue Gel)
See picture below of the wooden peices and eyelets to get a mental picture.
2. Take your mini wooden dowel and fit it into the wood skewer and make sure you have a good fit. When you are sure you do place a tiny drop or two of super glue into the hole you just drilled and quickly place the mini wooden dowel in the hole and support it while the dowel sets so you get it straight. It shouldn't take long if you use super glue. Due make sure you are only using a spot of glue. If you use too much glue and it gets on the dowel in other places your pinwheel may not spin smoothly.
3. Now set the skewer with the newly glued dowel aside for a bit and work on the pinwheel. Take one of your 1/8 eyelets and set it in the middle. Make sure not to grab any of the arms yet. You just want to set the eyelet in the middle.
4. Now we want to gather all the arms and set them. If you are using 2 peices of paper or card stock you may have to punch bigger holes so the 3/16 eyelet will fit in the arms. If you are using just 1 peice of paper or card stock then you should be fine. Make sure not to set the arms with the back that we set previously. We are setting the arms together as a group all on their own. If you are using 1 peice of paper then this probably went pretty smoothly. If you used 2 peices of paper or card stock then you are probably wrestling with it a bit. I used another mini down to collect all the arms. It was sort of like wrestling an octopus. LOL
5. Now that we have the pinwheel all set with eyelets, we want to slide the pinwheel on the mini dowel. Pick up your skewer and drop the final eyelet on the mini dowel with the wider end of the eyelet out so it will touch the pinwheel after you put it on there. Now put your pinwheel on the mini dowel with the arms facing out.
6. We are almost finished with the pinwheel. We just need to put on the front button. You don't want to get carried away with the glue here. If you get glue on the wooden dowel where the eyelet is trying to spin it may not spin smoothly. Place a couple of drops of glue in the hole that you drilled in the back of the wooden button. Now hold the dowel straight while also holding the pinwheel away from the glue so it doesn't dry to the dowel. Again if you are using a super glue this shouldn't take long. I think I held mine my pinwheel for maybe 2 minutes just to make doublly sure that it was fully dried.
7. Your done. If you plan to put in foam to make a pot of pinwheel then leave the skewer as is, however if you plan to give it to your little ones cut off the point so that it has a flat bottom.
If you have questions feel free to Contact Me


3 comments:
So cute! This makes me think I need this cart.
This is a fantastic tutorial. I got the Mother's Day cartridge for this very reason. Thank you so much!!
You are a really talented artist. Come join us at the Fantabulous Cricut Crawl starting on Monday! We will have great prizes! Enter some of your fabulous stuff!!
http://fantabulouscricut.blogspot.com
Jean I am having tons of fun with this cartridge.
PenLight thank you I checked out the blog and found some wonderful inspiration there! Thanks
Post a Comment