Monday, February 22, 2010
You Bloggers Want Us To Grab Your Buttons
"So how about instructions on how to do it? And I mean step-by-step! How/where do we put it into our profile?
Thanks!" Posted by Kathy B on the Cricut MB.
"Well DUH! as a graphic and web designer I should have already put up instructions on this. I am always sending instructions on FAQ when I do websites, templates, blogs and such. LOL Thanks Kathy B. for asking this questions. Sorry I don't know where I misplaced my manners. LOL So Here is how to add a button to your blog.
1. Sign into your Blogger account.(Top Upper Right Hand Side of Blog)
2.Click the Layout Tab
3.When on the Layout Page Click Add Gadget (A new Add A Gadget Window will Open)
4. Choose Html/JavaScript (Click the + plus sign)
5. Add title if desired (title is optional)
6. Copy the code from my code button box (make sure to copy all the code)
7. Paste the Code in the Content Box of Add A Gadget Window
8. Press Save (Now the window will disappear and once again you will be on your layout page)
9. Press Save on your Layout Page
10. View your Blog to make sure that you were successful.
Thanks so much for posting my button to your blog.
Sunday, February 14, 2010
Valentine's Day 2010 Candy Clutch
Happy Valentine's Day! I hope you are having a lovely lovely Valentine's Day!
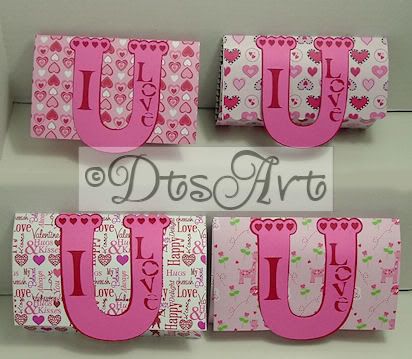
I was on Craft Junkie Too Blog and she had these cute little love paper bag pockets and a video how to on her blog. So that is where I got my inspiration for the I Love U candy clutches. Mine look more like little handbag clutches than paper bag pockets. LOL That is the great thing about crafting is that the same idea can turn out so differently. Anyway thanks to Tracy for the inspiration. If you want to see how she did it pop on over to her blog and read/watch all about it. I have put the valentine's day word paper and the I Love U file in a download for you if you want to use those. I realized when I went to make Valentine's that I had NO Valentine's Day Paper.
What to do, what to do? We have snow all over the ground so there was no way that there would be any quick trip to the craft store. I guess I would have to make due with red, pink, and white solid paper. Then it hit me. WOW I am a graphics designer. I could just make my own pattern paper, WAIT! I have made my own Valentine's Day Backgrounds before, not only could I make more I HAVE SOME! I would just print it out and use that! YEAH!! So that is what I did. I did use hounds tooth pattern paper in the inside of a couple of them that was store bought,not shown, but the rest are my pattern papers that I made on my computer. I made the Valentine's Day Word Paper for this project and I have made that one available to you. Spread some love leave a comment if you like the project or download. Thanks and Enjoy!
Free Download: DtsArt I Love U SVG and Valentine's Day Word Paper
Thursday, February 4, 2010
Sea Friends Mermaid
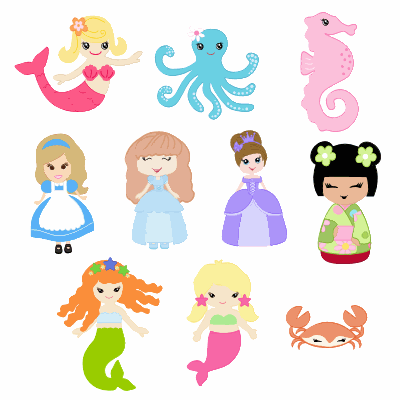
A couple of weeks ago on the MB. There was some discussion of the Once Upon A Princess Cartridge and the price. I said that I wouldn't be buying it unless the price was nice and discounted because overall the OUAP cartridge was similar to my own style of drawing and I had image similar to almost all the image they show being on the OUAP cartridge. I think it is an adorable cart but I need to show some restraint. LOL On the thread I posted a medley picture of some, yes only some, of the many little characters I have sitting on my computer. (on a side note: all images are copyrighted to ©dtsart. You may not remove, copy or otherwise use without my permission)
Well some of the posters on the thread thought they were cute and asked me if I had any in svg files. I didn't because I said on the thread. I had no idea that they would be any interest to anyone but me for cutting out. If you haven't figured it out I am new to the crafting community even though I have been crafting or tinkering as I call it for quite awhile.
Anyway, long story short I made a file of the first mermaid. As always there are svg files and scut files. The scut files were made with SCAL 1 so you can use them in SCAL 1 or 2. Also included are copyright notice and terms of use and the original dimensions. It was created about 5.5 inches wide I think it is. You will find:
- Mermaid Base
- Mermaid tail
- Scales
- shell top base layer
- shell top top layer
- hair base layer
- hair top layer
- flower base layer
- flower top layer
You do have to draw your own face. This is the first time I have released
one of my little characters. I would love to hear comments. What you think what I could to improve, do different, what you like about how I did it, etc. The more feedback I get the more likely I will release another one. I know that as web designer that my little characters have value it does kinda make me chuckle that people want to cut them and use the. I would LOVE if you did something with them if you would show me and maybe post a link to my blog and share a bit of love.
Free Download: Sea Friends Mermaid
Labels:
character,
cricut,
Cut files,
DtsArt original character,
free download,
Make the Cut,
mermaid,
SCAL,
scut file,
Sure Cuts Alot,
svg
Tuesday, February 2, 2010
New Look
How do you like my new look? It had been a long time since I gave the look of my blog any attention. I figured with all the guest I have visiting my blog these days I need to do some house cleaning and gussy up the place a bit. I think the little blue jays will be nice company for you as you explore my blog. I was so over the black and pink dress look. I thought about a snowman theme but after the snow I have had lingering on the ground around here I was tired of winter and ready for a bright cherry cheery look. Leave me a message and let me know what you think of the new look.
Monday, February 1, 2010
DtsArt Cricut Cartridge Storage Method ~ Storage Revisited
A few weeks I blogged about the little box svg file I made to hold my cricut solutions cartridge, Indie Art. It turned out cute and it was functional enough for sure. Well I bought some more Solutions Cartridges, Christmas and Snow Friends, I finally realized that if I keep buying the cartridges like I have been lately, that soon I am going to have to sort through a bunch of keypad overlays every time I use a cartridge. so I thought about it and came up with the DtsArt Cricut Cart Storage Method. I made a larger storage box to hold both the keypad overlay and/or the resource guide then combined it with the cricut cartridge box, and TADA!! A box that stores it all together. I won't have to hunt it is all together in one place.
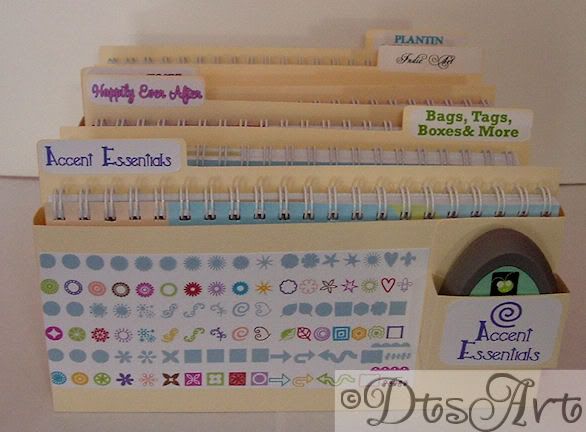
I used Manilla folders, because I had a TON of them left over from a project my son did last year. I was able to get 5 cricut cartridge boxes on one side of the manilla folder and 1 cricut keypad overlay box on the other side. The manilla folders really worked for me. But of course you can use whatever card stock you prefer. I assembled all the boxes both the cart box and keypad overlay boxes. Then I took my handy "dandi" glue stick and I glued the cart box to the front of the keypad overlay box. I then put labels on the front of the keypad overlay box of what cuts has. I then labeled each of the cartridge boxes with the name of the cartridge and a little picture of a shape that reminded me of that cartridge. I then put a label on each tab of the keypad overlay box of the name too. With me the font lover that I am I used different fonts for each cart name. The cool thing about the keyboard overlay box is depending on which way you score it you can have tabs on the left or the right. I varied them so they didn't all line up and block the ones behind it. It is a simple and concise all in one storage system.
Another great thing about this storage system is that you don't have to buy any specific box to put them in. You can put them in whatever plastic container or shoe box you have laying around that the keypad overlay box will fit comfortably in. I have mine in a larger plastic storage box because I tend to leave my new cartridges in the blister that it comes in until I use for the first time which can be awhile before I open it so I can fit those in the box too. I think my box cost me less than $3.00 when I bought it.
The zip file contains the cartridge box file, the keypad overlay box file, both in svg and scut. The SCUT file is a SCAL one file so you can open it up in either SCAL or SCAL 2. A text file that contains the width and height of the original dimensions incase you open it up in SCAL and your dimensions aren't correct. The text file also contains copyright information on Terms of Use. The files do include score lines so you know where to fold except on the tiny side flaps where it is obvious that you fold. Download Free: DtsArt Cricut Cart Box Storage
Subscribe to:
Posts (Atom)