Search DtsArt Blog

click to visit www.dtsart.com

Monday, May 31, 2010

Happy Father's Day Dad Side Step Card with a Twist and Download


I had been wanting to try my hand at a side step card for sometime. I think they are just too cute. I thought Father's Day would be the perfect time to give it a go. However, in my mind I also had a card that opened in the traditional way that said, "Dad" in a cut out style. I knew I really wanted to do that so I married the two ideas.
I then saw that My Pink Stamper, don't you just love that blog, was having a challenge on a Father's Day Theme. OH YEA!! motivation to get the card done early because I will be honest, if this particular card didn't get done early it probably wasn't going to get done at all because with summer approaching and kids home everyday life is going to get super hectic. Anyway the rules were that it had to be original. I think the marriage of a step card and my Dad front will qualify. Be sure to check out My Pink Stamper there are lot of great father's day themed cards and projects. It is a good thing Robyn is using random number as a way to choose a winner it would be hard to choose from all those wonderful projects.
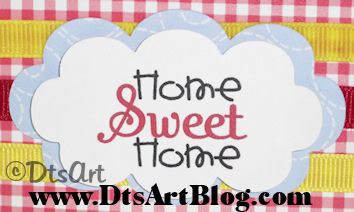
On the inside of the step card I used Cricut Create A Critter Cartridge, I know you're surprised LOL, for the monkeys and vines. I used Accent Essentials for the top note card in the very back for my sentiment. Plantin Schoolbook was used for all the grass. The Palm Trees are from Paper Doll Dress Up, the dinosaur page.

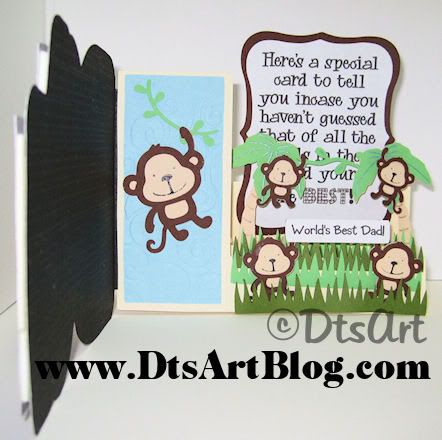
The sidestep card is 8½ by 5½ which ends up being about a size A2 card. There are score marks where you should either valley fold or mountain fold the step. I didn't put the score mark where you should fold the card in half I felt you could probably figure that out on your own...LOL Just carry that score mark all the way across the card.
On the Dad Title in the front. I debated on whether to add the tab where it needed to be folded to join the Dad front with the side step card and in the end decided to not add it to the svg file but added it to the SCAL scut file, which the tab is removable from the scut file. That way if you just liked the looks of the layered Dad you could use it for just a title for a layout or card or whatever. I always like versatility in my creations, because I myself often want to change up from what I did last time. LOL.
The Dad title front was created about 5.7 in width by 4.55 in height, exact measurements, terms of use and copyright notice are included in the file. Both the SVG files and SCAL scut files are included in the file. The SCAL can be used in either SCAL 1 or SCAL 2 since they were created in the original SCAL.

The zip file includes:

•An 8½ by 5½ Side Step Card (shown on the inside, second picture in off white)
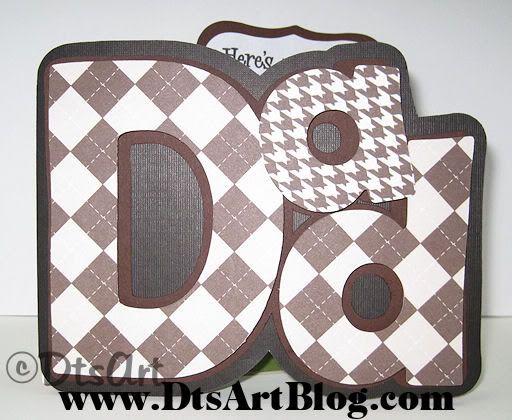
•A Base Dad (shown in dark chocolate brown)
•A Middle Dad (shown in brown)
•The Word Dad Title (shown in brown argyle and brown hounds tooth)

I have a house full of boys but alas I never have any boy man type paper. I am just not good at picking paper ahead of time that would be good for a masculine purpose. I always end up having to make my own masculine paper, at the time of the project, as was the case with the brown argyle and brown hounds tooth paper. But having said all that it was EXACTLY what I wanted and the tone what I was trying to achieve.
As always I am happy for anyone to download the file who has use for it including web sites that post free download links. However it is much appreciated if you leave a comment. It is just more fun that way for everyone!
Download: Sidestep Card and Dad Title

Hip Hip Hooray For Summer Treat Stick

As the school year winds down. I came up with these little Treat Sticks using the little 1x8 bags to hold M&M. It makes a nice have a great summer gift. I LOVE the new Create a Critter Cartridge. I have gone a little crazy with it lately. I use the little hippo from the create a critter cartridge. I did find the hip hip hooray a bit too girly to use for any of my boys.

Plus I didn't really want to worry about layering the phrase on the hippo either. I decided to use the 'ol image editor and come up with my own take on the phrase. I also wanted the word summer in my phrase. I decided to print the hip hip hooray for summer on the hippo's butt. The kid's, high school teenagers, really liked them. I think a lot of time we treat high schoolers too grown up and think they wouldn't want such baby-ish trinkets, but really they enjoy being a kid again if only for 5 minutes as they eat the candy and play with the hippo and dream about all the fun they will be free to have, when in a few days, summer offically starts for them.

Tuesday, May 25, 2010

Take Out Tuesday Freebie: Sea Friends Octopus SVG Download May 25


Well it is Take Out Tuesday! Thanks for returning and following my blog! This week I decided that the Sea Friends Mermaid need to be reunited with her friend the Octopus. The Octopus as you see it here is about 3.5 inches tall, actual measurements are include along with copyright notice and terms of use.
The zip file also includes:
  • A shadow Octopus (shown dark blue)
  • A Mid Layer Octopus(not shown in sample)
  • A Top Layer Octopus with face (shown in light blue)
  • A Top Layer Octopus with no face (In case you want to stamp a face on; not shown in example.)
  • A flower (shown in lavender)
  • A flower center (shown in pink)
I have a pink shadow layer under the lavender purple that was just done using the shadow feature in scale at two I believe.
DtsArt Take Out Tuesday Freebies are provided as a way to say thank you to my followers and available for a limited time only, Tuesday and Wednesday, so be sure to download it soon. Thank you for being a regular to my blog and for following me. If you are not a follower please become one so you don't miss the next Take Out Tuesday Download.

Download: No longer available. Please join us next Tuesday when Fresh Take Out will be posted. Be sure to become a follower so you will not miss anymore Take Out Tuesday Freebies. Take Out is posted for my followers to download on Tuesday and Wednesday, on Thursday we throw out the left overs.

Monday, May 24, 2010

Home Sweet Home Apple with Worm Card Using Create A Critter Cartridge

I have had so much fun playing with the new Cricut Cartridge Create a Critter It is a wonderful cartridge. I made a Home Sweet Home Card using the worm (cut at 1 inches), apple (cut at 3 inches), and cloud phrase cut out (cut at 1.75 inches). Over at the Jitterbuggin' Challenge weekly sketch challenge blog they provide a sketch to follow. In this challenge you had to follow the sketch and include a bug from any Cricut Cartridge and include pink and purple and add a flower. I needed a house warming card so with the challenge's requirements and my own needs in mind, LOL, this is what I came up with. The pictures don't show it too clearly but the apple and the Home Sweet Home sentiment are sticking up in the air. I used pop dots to add some height to the apple, worm, door, door gable, and sentiment card to add extra whimsy.


The card is a 5x7 card. The card cut is an svg file that I created as well as the door, the door gable and round scalloped circle. I wouldn't want you to be searching the cartridge for any of those. LOL. The pattern paper, red gingham, green striped, and the blue swirl, are papers that I previously designed and thought would work well with this card. Thanks to the design team over at Jitterbuggin' Challenge for giving me the inspiration for this card. I had fun participating in your challenge.

Saturday, May 22, 2010

Sneak Peak: Your My Boo'est Friend Closet Door with Monster Inside

Here is a bit of a Sneak Peak. I am working on a monster series of svgs cuts  called Monster Mania. It is going to have monsters, doors, and couple of other fun items. The more positive response I get from this post the more likely that I will post a file from the Monster Mania for you to download on Take Out Tuesday.
I added a door to this collection because that is where you find monsters, under beds, in attics, and in the closet of course. When I was in college and living with my older sister we had to use "Monster Spray", really air freshener, when we put my niece to bed. We had to walk all around the room spraying the Monster Spray everywhere paying close attention to under the bed and her closet. She had a walk in closet which was, "big and good place for a monster to live in". LOL I am sure we are not the only family that had to spray for monsters.

Well I got to thinking now that I have designed this door svg file how and what am I going to use it for. Then I was over looking at all the wonderful creations on the Fantabulous Cricut Challenge Blog Their Challenge Me Monday Challenge was to make a a bag or box project and include some black. When I read that it just hit me of course I have the closet door, I will attach it to a closet. I decorated mine with a monster inside but this closet box has TONS of possibilities. You could use it to put in gift cards for new babies, you can decorate the door to say baby is sleeping or their name etc. You can give grad gift cards or money fill it with any kind of little present pens, candy, with the sentiment when one door closes another opens... anyway you get the idea. After I created the closet box the ideas just started coming to me. LOL

Anyway I put one of my DtsArt Monster Mania monsters in the closet. I also just had gotten the Everyday Paper Dolls Cartridge and Create A Critter Cartridge in the mail and wanted to play with those so I added some clothes to the closet. I made the tiny hangers myself and was happy with how they came out. So this is a sneak peak of my Monster Mania Collection and my entry for the Challenge Me Monday over at FCC Blog. I made sure to include the black on my front door but on the inside of the closet all my little clothes are accented with black too.
Well I hope you enjoyed it, I know my daughter did. She has saved me the trouble of figuring out what to do with the closet as she begged me for it and told all her brothers, "Did you see Mommy's closet with a monster in it. She is going to give it to me when she is done.", which her brothers all fained polite interest in. I don't know what she is going to do with it but as she walked away mumbled something about, perfect for her littlest pet shop animals. I think those little pet are in FOR IT! LOL Be sure to come back soon and find out how the whole Monster Mania SVG Collection turned out.

Thursday, May 20, 2010

I won a Challenge!

I am so excited I won a challenge.I entered over my fun size candy flower bouquet in the Fantabulous Cricut Crawl over at the Fantabulous Cricut Challenge Blog. One of the elements that I used was one that FCCB Design Team Member Tammy had on her blog Addicted To Paper. The element was paper piecing. Boy I did a lot of paper piecing. It was worth it though because my daughter thought it was just too cool. She loved picking a flower and eating them. LOL Thanks to everyone over at the Fantabulous Cricut Challenge Blog. I had lots of fun playing along with your contest.
This was my winning entry:

Tuesday, May 18, 2010

Announcing DtsArt Take Out Tuesday Freebies

So I have a few followers now. Thank you to everyone who follows my blog. I appreciate it ALOT. Although I appreciate everyone who visits my blog, some people come from a few of those sites that collect free file download links. That is not to say I mind this, I don't. If I didn't want people downloading the files I wouldn't post them. It just seems kind of impersonal. I wanted a way to say thank you to my regulars, my followers, YOU! I think I found a way with DtsArt Take Out Tuesday Freebies. Every Tuesday I am going to put up a new file for my regulars, my followers, to download. The DtsArt Take Out Tuesday Freebie will only be available for download for a limited time. DtsArt Take Out Tuesday Freebie will be available for download on Tuesday and Wednesday. If you're a regular follower you won't have any trouble popping in for a few minutes to check out the latest download on Tuesday or Wednesday. It usually takes the freebie collecting sites a day or two to find the freebies and by that time DtsArt Take Out Tuesday Freebie most likely will be gone. I will continue to put up freebies from time to time on my blog for everyone to download  just like I do now. DtsArt Take Out Tuesday Freebie is just a little something extra my followers. See the first  DtsArt Take Out Tuesday Freebie Download in the post Below.
If you like it I hope you will post a comment.

Take Out Tuesday Freebie: Elegant Scroll Frame May 18


Hi All! Here it is my FIRST Take Out Tuesday Freebie! New Take Out will be posted every Tuesday so be sure to become a follower so you don't miss a freebie.
My inspiration for this came from the Elegant Cake Cartridge. I really liked the scrolling frame on that cartridge so I decide to draw a similar one. Mine is not exactly like the one on the EC Cartridge. Since I was drawing it I of course did my own thing. I think it came out really fun.
The elegant scroll frame was created at about 3.5, actual measurement are included in a text file in the download. The sample frame was cut at about 4.25 inches of course you can size it to your needs. I also used Cuttlebug folders to emboss the tan base and the white top frame. The file holds both svg files and scut files. The scut files were made with SCAL 1 so you can use them in SCAL 1 or 2. Also included are copyright notice and terms of use and the original dimensions.
The zip file includes:
  • A Base Scroll Frame(shown in beige)
  • A Middle Scroll Frame (shown in brown)
  • A Top Scroll Frame Title (shown in white)
The base and middle frame are the same size. If you want the base to be a bit bigger you can use the shadow feature in your cutting program. I just wanted the back to be visible I didn't necessarily want a shadow feature.
DtsArt Take Out Tuesday Freebies are available for a limited time only, Tuesday and Wednesday, so be sure to download it soon. Thank you for being a regular to my blog and for following me.  If you are not a follower please become one so you don't miss the next Take Out Tuesday Download

Download: No longer available. Please join us next Tuesday when Fresh Take Out will be posted. Be sure to become a follower so you will not miss anymore Take Out Tuesday Freebies. Take Out is posted for my followers to download on Tuesday and Wednesday, on Thursday we throw out the left overs.

Sunday, May 16, 2010

Spring eBay Store Make Over

I really like how this eBay Store turned out. It is so bright and cheery and perfect for spring. The colors are so vibrant. It was a real pleasure working with Melinda owner of bid_said_fred. She had purchased the template some time ago and really liked it. When she opened her eBay Store she wanted it to match. The matching Me Page is just as cute too. If you need some web design work, website, blog, ebay store, business card design, etc, feel free to Contact Me.

Saturday, May 15, 2010

Birthday Cupcake Pull Top Can

I made this cute little pull top can in a cupcake theme for my daughter's birthday. It turned out too cute. I upcycled it from an 8.75oz fruit cup. I used a safety opener to open the canned fruit up from the bottom. I washed and cleaned it out real good. Since it was for a birthday I thought this cupcake cutie coordinating paper would work GREAT! and it did. I like what embossing the papers with cricut cuttlebug folders added to the cupcakes too, made the cupcakes charming.

I was real happy with how it turned out. It has little sayings like cute as a cupcake and sweet with a medley of cupcakes on it. I actually drew and made the theme about 3 years ago but I find that I still pull it out and use it every now and again. It works great for other things besides birthdays because it doesn't actually say happy birthday. The top of the lid was cut out using a coordinating cupcake paper, a different color pink with larger cupcakes on it. I then added ribbon to the pull top that matched the colors of the paper.

What is inside you may ask? Well we have a family full of ipod touch users. We went from having about 5 ipod charging cords to having ONE. LOL I should be grateful that it was the charging cords that broke and not an ipod. LOL It was becoming a battle to get the ipod charging cord first so my daughter wanted one so she didn't have to battle for it any more. I thought putting it in a pull top can would be a good way to disguise what she was getting. LOL I also filled it with Starburst.

Wednesday, May 12, 2010

Fun Size Candy Paper Flower Bouquet Happy Birthday Arrangement

I made this for my daughter's birthday. I wanted something for the center piece and I had seen the flower bouquets everyone was doing with suckers but I she we (I am sure her brother's will help) like candy better. I decided to use Fun Size Candy Bars in my bouquet. While I was forming this center piece in my mind I popped over to the Fantabulous Cricut Challenge Blog where they were having a cricut crawl and decided to incorporate some of those ideas into my floral arrangement. They had some really nice projects using those designs. Let me tell the design team over at Fantabulous Cricut Challenge Blog which of their ideas I incorporated in my project and we will get to the how to of my fun size candy flowers after that.
The elements I incorporated are:
  • Of course, the Flower Power element featured on Cokie Pop Paper
  • Embossing on a Cricut cut elements featured on Paper Crafts by Candace
  • Die-Cut Negative element from Organized Chaos (This may not be so obvious but I used a round swirl and instead of throwing out the negative I cut a circle around it and used it as a snails shell. ;-) )
  • A swirl element because I don't have a Gypsy featured on Yonique Reflections (I put a swirl on some of the flowers one from the snail I just spoke about above. If it wasn't for these designing team ladies I think the snail would have been shell-less. LOL)
  • The shadow feature element from Light Whimsy
  • Paper piecing element from Addicted to Paper (Boy did I paper piece. LOL)
  • A Food Element Altered featured on Crafty Go Lucky (I assume candy counts as food, but don't tell my kid's I said that! LOL)
  • Thanks to all the members of the design team over at Fantabulous Cricut Challenge Blog I had lots of fun incorporating your ideas into my project.
Now let's get down to how I accomplished the fun size candy flower bouquet. It wasn't really my intention to cover the fun size candy completely. I didn't mind if some of them showed but for the most part they all pretty much ended up being covered and camouflaged. You will need to have some fun size candy on hand for this project. This is what I used. My daughter is pretty picky about the kind of candy she likes.

The list of supplies:
  • Fun Size Candy Bars
  • A pot or vase bottom of some sort to hold your bouquet
  • Floral Foam
  • Light weight wire (I used 24 guage)
  • green floral tape
  • Craft Picks
  • bamboo skewers
  • Terrifically Tack Tape
  • Flowers cut out in various sizes using your cricut or other cutting machine. I used about 3 or 4 different cartridges
  • A title or banner. I have a Happy Birthday SVG available to download in a previous post.
  • Some insects or birds or some kind of life cut outs using your cricut or other cutting machine.
  • Leaves cut out in various sizes using your cricut or other cutting machine.

You want to take your 24 gauge wire and cut it about 5 inches long and wrap it around the bottom of a Craft Pick then you want to it around the bamboo skewers. You want to kind of point it out as if it were a leaf on a stem. You will want to add 3 or 4 craft picks to the bamboo skewers. I wouldn't advise adding more than 4 to a skewer as the candy is a bit more weighty than you think and too many candy bars on one stem can cause it want to bend and not stand up straight.


A close up.

Now you will want to wrap your craft tape around the skewer going up just enough around the craft pick to cover the wire.

Once you have the skewers covered you will want to take the fun size candy and flip it to the back. Most of the wrapper labels have little flaps that you can lift up. Take some Terriffically Tacky Tape and and run it along this flap. Now place the craft pick in between the flap and wrapper. Think of a leaf protuding out. On the Reese Cups, there is no flap. I just slide the craft picks through the back of the wrapper. The craft picks will poke out the top of the Reese Cups but you can just cover the the part that sticks out with a bug, flower or something.

Once you have all your candy branches added to the stem you want to start taping your flowers and leaves onto the candy bars to cover them. When you are done covering all the candy with flowers put the flowers stems into the floral craft foam and arrange them to look cute. After all the flowers are planted into the foam add the insects. That is is your done with your fun size candy flower bouquet. Now you can start picking your flowers and eating them. YUM!


2010 SVG Cut File to Download

Here is a 2010 svg cut file that is welded together. This was a request. If you have come here from a third party site that collects and post free svg to download I would appreciate if you would take the time to comment. It makes me more inclined to put up freebies when people take time to say some nice words. I see that many people come here from those type of sites to download. Although I am happy to share I would be happier if you took the time to comment.
The file holds 2 svg filesa base and title. Also included are copyright notice and terms of use and the original dimensions.
The zip file includes:
•A base 2010(shown in blue)
•A 2010 (shown in red)
Download: 2010 Welded File

Saturday, May 8, 2010

Happy Birthday SVG File to Download

My daughter is having a birthday soon and I of course needed a Happy Birthday title for a project I am working on. (Come back soon to see the completed project. It is too cute. You won't want to miss it.) So I played around a bit and this is how it came out. It conveys, "let's celebrate your birthday" PERFECTLY, at least I think it does; if it doesn't don't tell me LOL. I thought I would make it available for download. I made mine in pink but I think it would work equally well in blues for a boy, or primary colors for those turning 30,40,50,etc. The Happy Birthday was created and cut at about 5 inches of course you can size it to your needs. I also used Cuttlebug folders to emboss the light pink Happy Birthday and the dark pink Happy Birthday blackout shadow. The file holds both svg files and scut files. The scut files were made with SCAL 1 so you can use them in SCAL 1 or 2. Also included are copyright notice and terms of use and the original dimensions.
The zip file includes:
  • A base Happy Birthday (shown in medium pink)
  • A Happy Birthday Title (shown in light pink)
I did not include the large shadow file(shown in dark pink) because all that it is the base Happy Birthday on Blackout Shadow on 3 in SCAL. I think you can make that yourself and you may not want your shadow that fat so that is why I did not include that in the zip file. If you would like other celebration phrases or words in this style let me know and I will see what I can come up with for you. If you do something with the file I would love to see it drop me a link to it or something.
Download: Curly Fun Happy Birthday Title

Friday, May 7, 2010

A Sunny Teacher Appreciation Gift

Today's teacher appreciation gift had a theme of  "Think Summer". With that in mind, I remembered that the Hello Kitty Greetings Cricut Cartridge had a cheerful little sun on it that I could work with. I took 2 toilet paper rolls covered them with yellow vinyl, although I am sure card stock would work too. I cut 2 circles at 1.660 inches in heavy card stock covered in vinyl to make a bottom for each toilet paper holder. I used vinyl to cover the toilet paper rolls because it was already sticky so I could save a step. I cut 2 orange suns on heavy card stock at 6 inches using the blackout feature. I cut out 2 yellow suns on heavy card stock at 5 3/4 inches using the clothes feature. After cutting all the pieces I embossed them with cuttlebug folders. I used 4 pieces of terrifically tacky tape to adhere the orange card stock to each side. I printed and cut out 2 little thank you notes from an svg file I had and put them on either side of a craft pick and put the pick inside one of the toilet paper rolls. I used some terrifically tacky tape to adhere it to the inside. Both sides look exactly the same so there is no front or back. I then filled the tubes with Fun Size Kit Kats and Twix. I got this quick and fun idea from LightWhimsy, while blog hopping, who did a classic apple.

Thursday, May 6, 2010

Flower Fairy Lila May Digital Stamp

 Meet Lila May the flower fairy. Lila May Flower Fairy is available as digital stamp set or  you can purchase each Lila May pose individually if you like. The digital stamps are available to instantly download after payment has been received.

Purchase Lila May Flower Fairy in a Tea Cup Digital Stamp


Purchase Lila May Flower Fairy Holding a Large Flower Digital Stamp


Purchase Lila May Flower Fairy in a whimsical frame Digital Stamp


Purchase Lila May Flower Fairy holding a small flower Digital Stamp

Related Posts with Thumbnails